Cartridge / 3D Widget Customization
- Tutorial
Training
The Widget3D is a virtual representation of a piece of equipment in a map in the form of a floating bubble that is replaced by a selection cartridge with more information.
The information outlined in blue can be modified using Javascript.
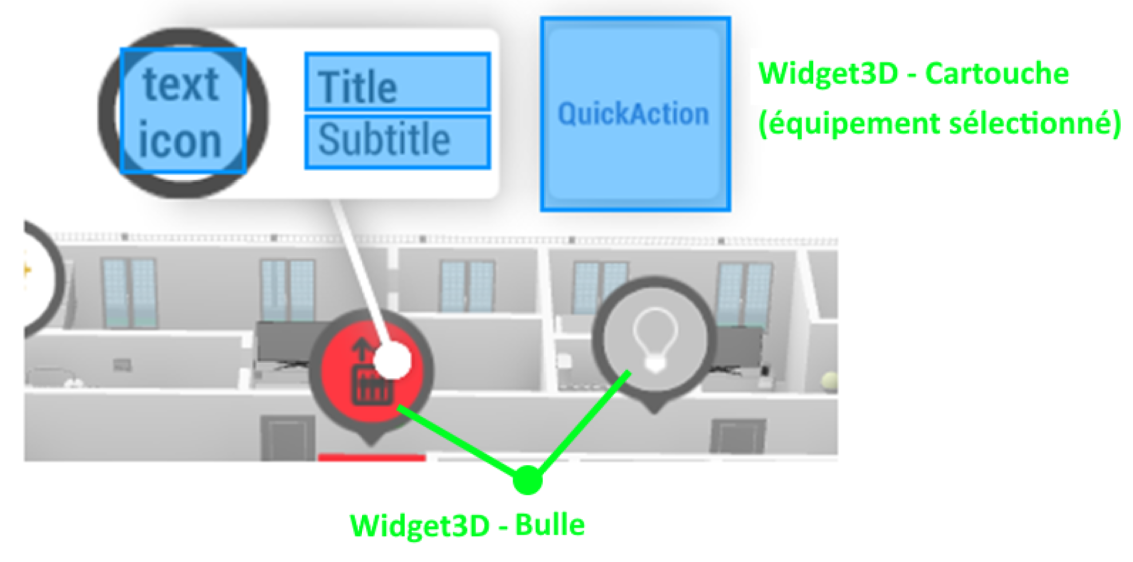
The Widget3D is composed of 4 distinct parts:
- The information bubble: In the form of text or icon, it gives quick information on the status of the equipment. By default, it represents the icon of the equipment family and the color of the bubble depends on the condition of the equipment
- Connected: White Bubble
- Default: Red bubble
- Disconnected: Grey bubble
- Workflow status (color associated with workflow)
- The cartridge visible when the equipment is selected:
- Its title: which by default represents the name of the equipment
- Its subtitle: which by default represents the family of the equipment or its business status (Defect in progress, Under construction etc ...)
- The QuickAction button: Allows you to perform a quick action on the equipment. By default, it is not visible.
Customizing the content of a 3D Widget:
Through the JS scripts, we can modify the information that is visible in the 3D Widget, for this we just have to add the function Customize, or to use and complete the same Customize function previously used to customize the Widget2D, indeed the customization is done at the same time.
// Modifies the content of widget2D and widget 3D for a given equipment.
function Customize(equipment, widget2d, widget3d)
{
    Widget3D.text = ":)" ;
}
When this function is present in a script, it will be called each of the devices associated with that script each time the device is modified or a UI element appears in the interface.
The Customize function exposes 3 parameters:
- equipment: The equipment that will be customized
- widget2D: The UI object for changing the representation of the device in all 2D listings.
- widget3D: The UI object for modifying the representation of the equipment in the 3D.
Description of the Widget3D object (editable fields):
- widget3D.title
- The title in bold at the top of the title block
- Format: string
- Default: The name of the equipment
- widget3D.subtitle
- The text below the title.
- Default: The name of the equipment family.
- Format: string
- widget3D.text
- Informational text displayed in the balloon and title block.
- Default: empty
- Format: string
- widget3D.textColor
- The color of widget3D.text
- Format: color
- widget3D.icon
- The icon in the balloon, if widget3D.text is already set, the icon is not displayed.
- Default: The equipment family icon
- Format: icon
- widget3D.iconColor
- The color of widget3D.icon
- Format: color
- widget3D.iconBackgroundColor
- The background color of the bubble.
- Default: transparent
- Format: color
- widget3D.iconFillAmount
- The amount of fill of the background color. Any value between 0 and 1, 0 = empty, 1 = filled, 0.5 = half-filled.
- Default value: 1
- Format: Single
- widget3D.iconFillMethod
- The method of filling the background color.
- Possible values
- Vertical: The color fills from bottom to top.
- Horizontal: The color fills in from left to right
- circular: The color fills clockwise.
- Default: circular
- Format: string
- widget3D.quickAction
- Manages the display of a QuickAction button, the value corresponds to the text of the button, if the latter is not filled in the button is hidden. For more information on how to use the QuickAction button, refer to the corresponding tutorial.
- Default: empty
- Format: string
- widget3D.quickActionIcon
- The icon displayed in the QuickAction button. The icon is hidden if the value is not populated.
- Default: empty
- Format: icon
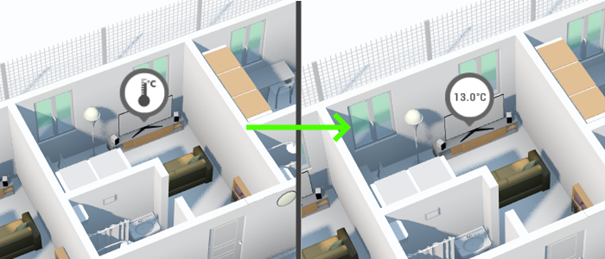
Widget3D example: Displaying text in the balloon to see the temperature of a sensor
In this example, we'll display the temperature value of a sensor directly in its equipment bubble.
Prerequisites:
- Family:
- Temperature sensor
- Script:
- Thermometer
- Import rule:
Capteur de température - Implemented methods
Customize
- Import rule:
- Thermometer
- Equipment Instance:
- Temperature Sensor 1
- Family: Temperature Sensor
- Variables
TEMP: 13.032
- Temperature Sensor 1
Example script:
function Customize(equipment, widget2d, widget3d)
{
  // Récupération de la variable TEMP de l'équipement
  // Astuce : Une variable peut être récupérée via son nom (Température) ou sa référence (TEMP)
  let temperatureVar = equipment.GetVariable("TEMP");

  // Modification du texte par la valeur de la température (1 décimale) ajout et de l’unité
  widget3d.text = temperatureVar.AsFloat.toFixed(1) + "°C";
}
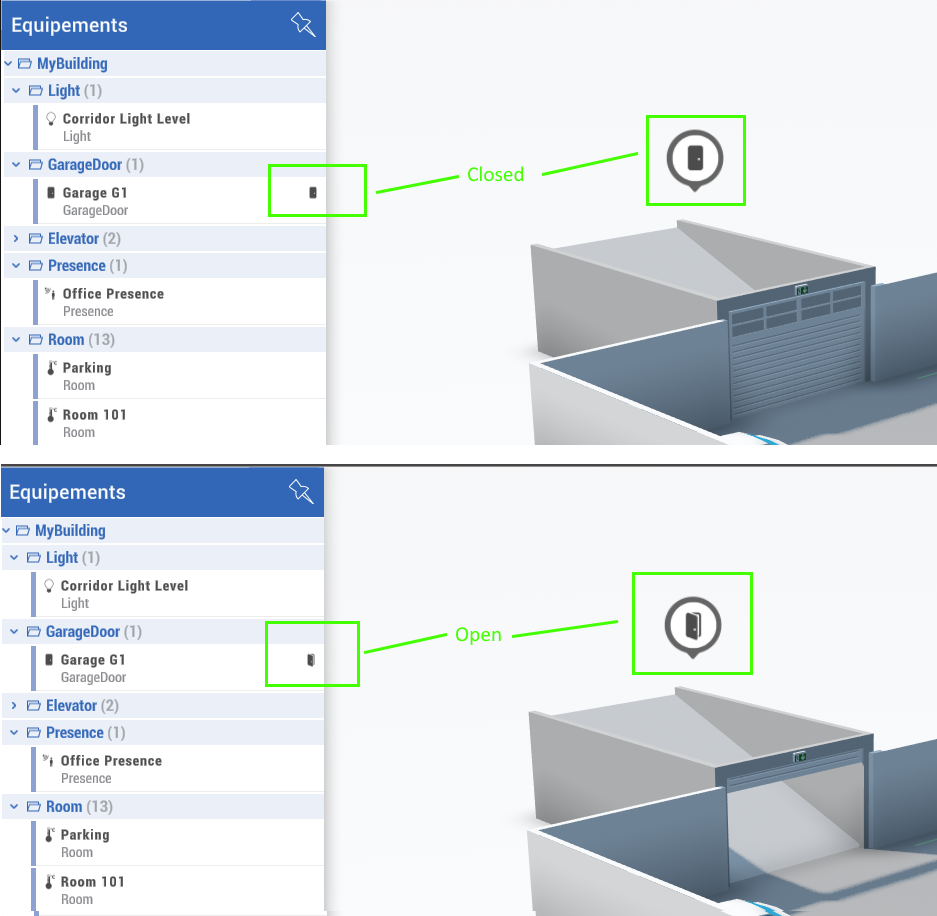
Widget3D Example: Displaying an Icon to Represent the Status of a Door
In this example we will modify the icon displayed in the 3D bubble according to its opening state, and add the same icon in the Widget2D.
Prerequisites:
- Family:
- GarageDoor
- Script:
- GarageDoor
- Import rule:
GarageDoor - Implemented methods
Customize
- Import rule:
- GarageDoor
- Equipment Instance:
- Garage G1
- Family: GarageDoor
- Variables
DOOR: true / false
- Garage G1
JS script:
function Customize(equipment, widget2D, widget3D)
{
  // Récupération de la variable qui porte l'état de la porte.
  var doorVar = equipment.GetVariable("DOOR");

  // L'état de la porte étant une string pouvant avoir 2 valeurs Open/Close, on calcule si la porte est ouverte en vérifiant la valeur.
  var isOpened = doorVar.AsString == "Open";

  var iconReference = isOpened ? "Icon Door_Opened"
                               : "Icon Door_Closed";

  // On applique l'icône à la 2D et 3D
  widget2D.icon = widget3D.icon = iconReference;
}
Widget3D example: Display of the QuickAction button to open a web page
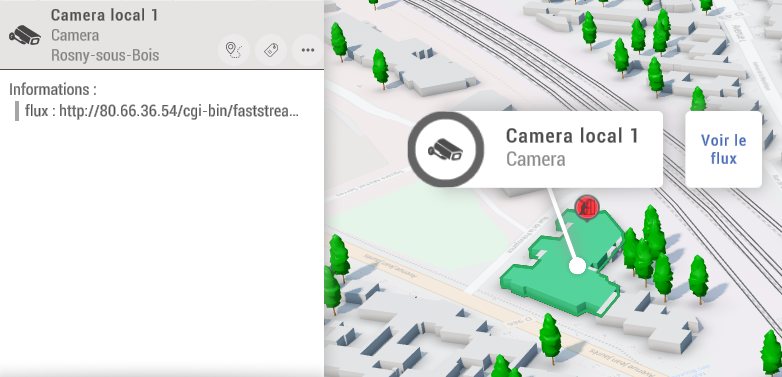
In this example, we'll display a button for a camera device to open a web page to access the camera's feed.
Prerequisites:
- Family:
- Door
- Script:
- StateDoor
- Import rule:
Porte - Implemented methods
Customize
- Import rule:
- StateDoor
- Equipment Instance:
- Local Camera 1
- Family: Camera
- Variables
flux: URL of the page to open
- Local Camera 1
The display of the button is done via the implementation of the Customize. When the user clicks the button, the ExecuteQuickAction is called. In our example, the function call retrieves the value of the Flux variable, which is a url, and passes it as a parameter of a function to trigger the opening of a web page.
Script:
// Ajout d'un bouton avec le label "Voir le flux" dans le menu des actions rapides
function Customize(equipment, w2d, w3d)
{
    w3d.quickAction = "Voir le flux";
}

// Implémentation de l'action rapide "Voir le flux" : affichage d'une page web
function ExecuteQuickAction(equipment)
{
    let flux = equipment.GetVariable(“flux”);
    WebView.Show(flux.AsString, false);
}
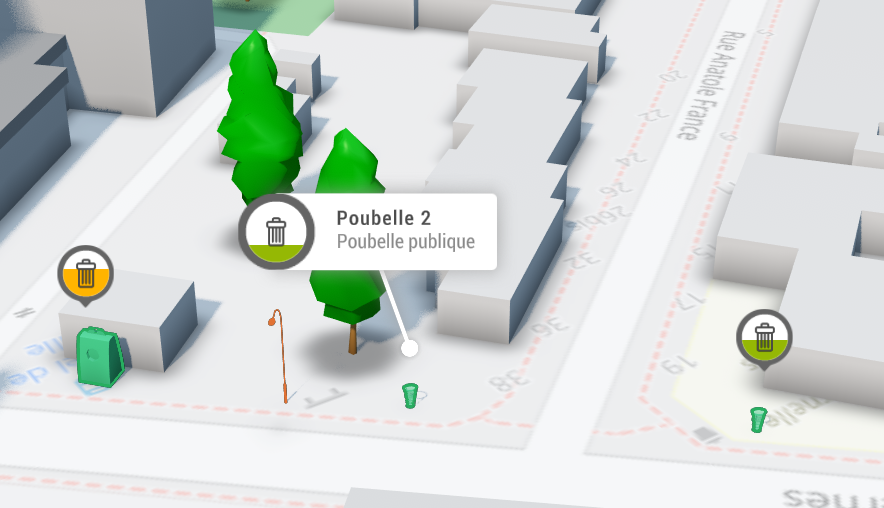
Widget3D example: Example of displaying a trash can (icon fill)
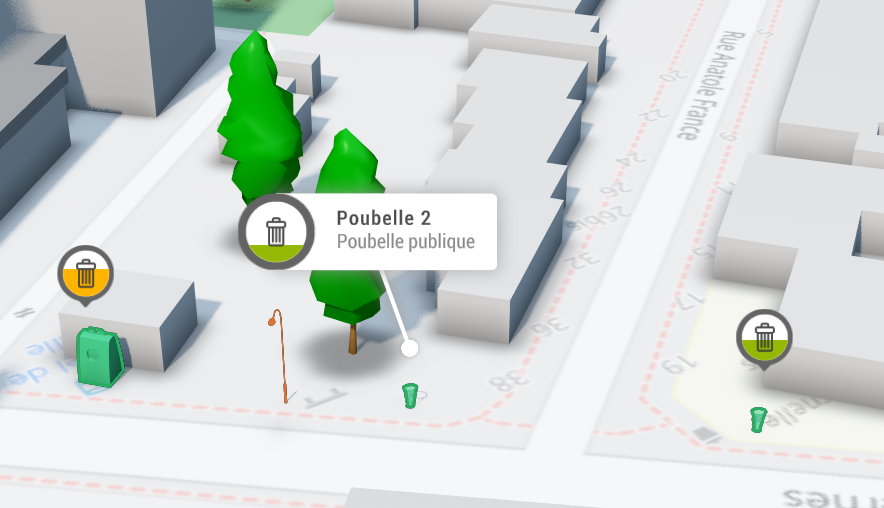
In this example, we have 3 public bins that increase their filling rate. We want to represent this rate directly in the bubble of each bin by filling the background in color.
Prerequisites:
- Family:
- Public garbage can
- Script:
- Trash can
- Import rule:
Poubelle publique - Implemented methods
Customize
- Import rule:
- Trash can
- Equipment Instances:
- Trash Can 1
- Family: Public trash can
- Variables
Remplissage: 25 (corresponds to 25% occupancy)
- Trash Can 2
- Family: Public trash can
- Variables
Remplissage: 35 (corresponds to 35% filling)
- Trash Can 3
- Family: Public trash can
- Variables
Remplissage: 65 (corresponds to 65% filling)
- Trash Can 1
The bubble is filled via the implementation of the Customize.
The color of the bubble will take 3 values according to different value thresholds,
and the fill value is assigned vertically.
Script:
// Remplissage de l'icône et changement de sa couleur en fonction de la valeur du capteur
function Customize(equipment, widget2D, widget3D)
{
  var fillVar = equipment.GetVariable("Remplissage");

  // Customize the color and its fill
  var color = "white";

  if (fillVar.AsFloat > 70)  color = "#FFFF7702";
  if (fillVar.AsFloat <= 70) color = "#FFFFB400";
  if (fillVar.AsFloat <= 50) color = "#FF95B804";

  widget3D.iconBackgroundColor = color;
  widget3D.iconFillAmount = fillVar.AsFloat/100; // Value is from 0 to 1
  widget3D.iconFillMethod = "Vertical";
}