My Building - Lamp Control
- Tutorial
Tutorial
This chapter describes the supervision and control of lamps in a building. It showcases the customization of their visual representation in the digital twin as well as the implementation of controls to turn the lamps on or off directly from the interface.
In the majority of installations, lamp supervision is present and constitutes The main vector of commands sent from the software to the equipment in order to control their switching on and off.
In this tutorial, we'll see how to customize the display of lamps in the app depending on their status, as well as set up buttons allowing commands to be sent to the lamps.
Functional objectives
- Colouring the equipment bubble according to the lighting status of a lamp
- Added a Quick Action button to send a command to turn a lamp on or off
Prerequisites
- Creating a Family-Related Behavior Script
Light - Association of the
Lightto a bubble of equipment in the digital twin
Colouring the equipment bubble according to the lighting status of a lamp
In order to achieve the goal we have set ourselves, all we have to do is implement
The function Customize, already seen previously.
The first step is to retrieve the state of the variable Light
to determine whether the lamp is on or off.
The property icon widget icon allows you to change the icon displayed
by the equipment. The icon name must match an image asset
previously added to our organization.
The property iconBackgroundColor Allows you to change the background color of the icon.
It is possible to pass a color name or directly a color in hexadecimal format.
function Customize(equipment, w2d, w3d)
{
  let isOn = equipment.GetVariable("LIGHT").AsInt > 0;

  // Modification de l'icône et de la couleur de fond en fonction de l'état de la lumière
  w3d.icon = isOn ? "Icon Lamp_On" : "Icon Lamp_Off";
  w3d.iconBackgroundColor = isOn ? "yellow" : "";
}
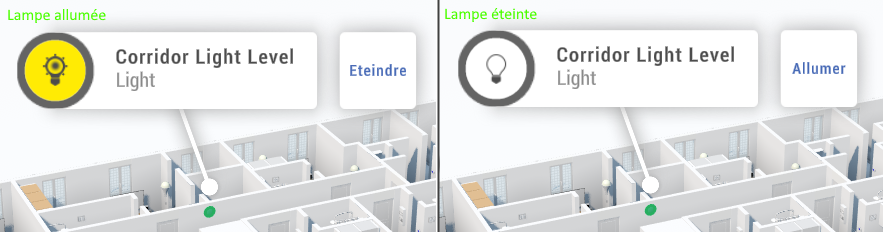
Once the script is applied, the tooltip associated with a lamp appears in yellow when the lamp is on, and changes icon.
Added a Quick action button to send a command to turn on/off a lamp
In order to add a button for sending orders,
We need to add some code to the function Customize.
The property quickAction widgets allows you to add buttons
Quick Interaction, which is labeled to match the text associated with the Quick Action.
In our case, the text of the action depends on the state of the lamp:
- Power off
- Turn on
We then add the ExecuteQuickAction,
which will be called when the user clicks the button.
Our implementation calls the endpoint /api/Scene from our server
by sending the body corresponding to the necessary parameters
to turn the light on or off.
The two promises then and catch allow us to display
Messages when the endpoint returns a response.
in order to inform the user of the correct or incorrect execution of the order.
JS script:
function Customize(equipment, w2d, w3d)
{
  let isOn = equipment.GetVariable("LIGHT").AsInt > 0;

  // Affichage du bouton QuickAction avec le bon label
  w2d.quickAction = w3d.quickAction = isOn ? "Eteindre" : "Allumer";

  // Modification de l'icône et de la couleur de fond en fonction de l'état de la lumière
  w3d.icon = isOn ? "Icon Lamp_On" : "Icon Lamp_Off";
  w3d.iconBackgroundColor = isOn ? "yellow" : "";
}

// Implémentation de la QuickAction pour l'allumage/exctinction des lumières
function ExecuteQuickAction(equipment)
{
    let isOn = equipment.GetVariable("LIGHT").AsInt > 0;

    let serverUrl = "https://localhost:7003";

    // Construction du body à envoyer au endpoint
    let body = {
        sceneName : "Corridor Light",
        action : isOn ? "off ": "on"
    };

    // Envoi de la requète au endpoint server/api/Scene
    WebRequestProvider.Post(serverUrl + `/api/Scene`, JSON.stringify(body))
    .Then(response =>
    {
        // Affichage d'un toast de succès et récupération des données
        Immersive.Toaster.ToastSuccess("Commande éclairage Ok");
        Immersive.Hub.ObserveSingleUpdate();
    })
    .Catch(error =>
    {
        // Affichage d'une erreur en cas de problème
        Immersive.App.ShowPopup("Commande éclairage", "La commande n'a pas pu être effectuée");
    });
}