My Building - Temperature and Humidity Sensors
- Tutorial
Tutorial
This chapter presents a concrete use case for grouping physical sensors and enhancement of temperature data in the digital twin. It illustrates how scripting makes it possible to unify the display, to format the values and to strengthen supervision via calculated defects.
In our use case, the temperature and humidity sensors are deployed as two sensors physical aspects on the ground. However, from the end-user's perspective, These two measures are intimately linked and must be consulted in a unified manner.
This is why we have chosen to group these two sensors within a single piece of equipment Immersive, named "Room", in order to represent a piece in a coherent way in the digital twin.
For the representation of the temperature sensor in the digital twin, The central element is the measured value. The main objective is to highlight this key information by displaying it directly in the equipment bubble, thus offering immediate and intuitive reading.
In addition, the displayed values will be formatted with their unit in order to improve the readability and understanding of the data by the user.
Finally, in order to strengthen supervision, a calculated defect will be added. This will trigger an alert when the temperature exceeds a predefined threshold, thus ensuring rapid detection of abnormal situations.
Functional objectives
- Bring together two physical sensors (temperature and humidity) within the same Immersive "Room" equipment
- Display the temperature measurement directly in the equipment bubble
- Formatter values to include the unit of measure
- Generate an alarm when the temperature exceeds a set threshold
Prerequisites
- Creating a Family-Related Behavior Script
Room - Combining Rooms in the digital twin.
Display of the temperature measurement in the equipment bubble
Through JS scripting, we can modify the information that is visible
in the icon associated with the equipment in the twin (Widget3D),
To do this, simply add the Customize to our script.
The property we are interested in is the property text of the Widget3D
as shown in the following diagram.
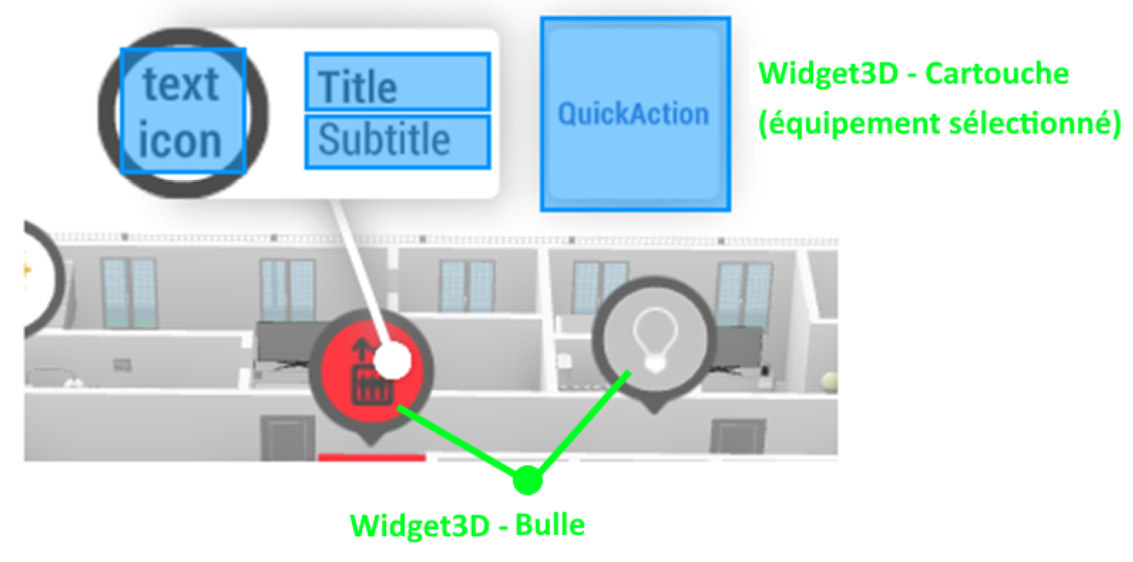
The function Customize is called when a variable is changed
and that the interface needs to be updated.
Access to the temperature measurement is done directly from the object equipment.
To do this, simply retrieve the temperature variable that is referenced
by the identifier TEMP in the description of our family.
The variable reference is used here, but the name of the
Température can also be used.

JS script:
function Customize(equipment, widget2d, widget3d)
{
  // Récupération de la variable TEMP de l'équipement
  // Astuce : Une variable peut être récupérée via son nom (Température) ou sa référence (TEMP)
  let temperatureVar = equipment.GetVariable("TEMP");

  // Modification du texte par la valeur de la température (1 décimale) ajout et de l’unité
  widget3d.text = temperatureVar.AsFloat.toFixed(1) + "°C";
}
Once the script is applied, and the application is restarted, you can see the changes.
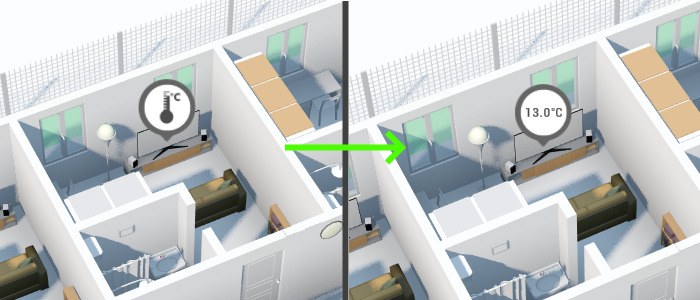
For more details on customizing the interface associated with a piece of equipment, The complete documentation is available: here and here. (link to tutorial: Customisation Widget2D and Customisation Widget3D).
Form values to display units
Measurements from the field sometimes represent physical quantities associated with a unit of measurement (Temperature °C or °C, Speed, Energy ...).
These measurements often have a lot of decimal places, which are not always relevant to the user.
It is therefore recommended to limit the display to a single decimal place to make the information clearer.
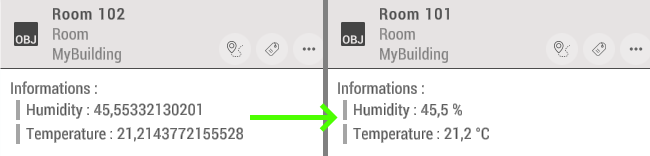
As shown in the example above:
- The raw values (left) are difficult to read.
- After formatting (right), the values are rounded to one decimal place and accompanied by their unit, which makes it easier to read.
Two complementary methods will be presented to achieve this:
- The upstream configuration of the units of measure, directly in the Excel file.
This approach makes it possible to standardize the display of data as soon as it is integrated.
- Formatting via the Behavior script, which provides more flexibility
and allows you to dynamically adapt the display (unit, number of decimal places) as needed.
Both approaches result in a clear, consistent and understandable display for the end user, while maintaining the accuracy of the raw data in the background.
Configure the unit of a measure from Excel
When configuring the measurement channels of a piece of equipment from the Excel file, It is possible to specify the unit of measurement associated with each channel.
- If no units are specified, the values are displayed as is in Immersive.
(example on the left)
- If a unit is configured, Immersive automatically adds that unit next to the value
and limits the display to a single decimal place for more readability. (example on the right)
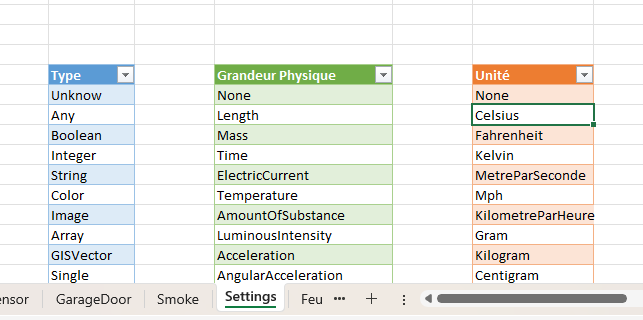
In our case, we configure the units Celsius and Pourcent
in the column Unit for the Temperature and Humidity channels.

The complete list of compatible units is available in the Settings of the Excel file.
Formatting the display of a variable from Scripting
In some cases, it is necessary to modify more finely the way a variable displays its value.
To be able to do this, it is necessary to implement a new JS scripting method
In the behavior of our equipment: GetFormattedData
Example:
// Fonction de formatage des variables
function GetFormattedData(equipment, variable)
{
    // Formatage spécifique selon la variable
    // Filtre par nom : variable.Name => "Temperature", "Humidity"
    // Filtre par référence : variable.NameKey => "TEMP", "HYGRO"
    switch (variable.NameKey)
    {
        case "TEMP" : return variable.AsFloat.toFixed(1) + " °C (formattage js)";
        case "HYGRO" : return variable.AsFloat.toFixed(1) + " % (formattage js)";
    }

    // Dans les autres cas on retourne une chaîne vide, le formattage est geré par défaut.
    return "";
}
The result of our script is as follows:
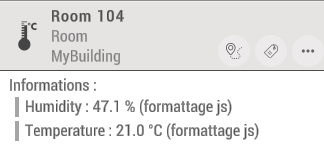
Generation of an alarm in the event of a temperature threshold being exceeded
In the rest of our scenario, we want to warn the user when a temperature exceeds a certain threshold so that they can react quickly. To do this, we will define an Alert that will be highlighted directly in the interface.
The creation and lifting of alerts is done in 2 steps.
- Implementing the Function
SetupEquipmentto create the alert. - Implementing the Function
OnEquipmentChangedfor the calculation of the alert.
Creating the alert: Temperature too high
In order to record a new alert on a piece of equipment, a call to the function is used CreateStaticFault when the equipment initializes. It allows you to create a channel in the "Defect" category of the equipment.
JS script:
function SetupEquipment(equipment)
{
  // Création d'un nouveau défaut
    equipment.CreateStaticFault('Température trop élevée');
}
Alert calculation: Temperature too high
The threshold exceedance alarm must be calculated as soon as the temperature sensor receives an update of its values, so we add the calculation in the function OnEquipmentChanged which is dedicated to this task.
After retrieving the 2 variables (measurement and alert) on our equipment, we just have to implement the business rule for generating the fault and update our alert. Here we trigger the "Temperature too high" fault if our temperature measurement has received a value from the server (IsConnected), and if its numerical value (AsFloat) is greater than 40.
JS script:
function OnEquipmentChanged(equipment)
{
    // Récupération de la variable de température et d'alarme.
    var temperatureVar = equipment.GetVariable("TEMP");
    var temperatureTooHighVar = equipment.GetVariable("Température trop élevée");

    // L'alarme doit être déclenchée :
    //  * si la température est connectée
    //  * et si la valeur mesurée au dessus de 40°C.
    let isAboveThreshold = temperatureVar.IsConnected
                        && temperatureVar.AsFloat > 40;

    // On affecte la valeur calculée (de type boolean) à la variable d'alarme.
    temperatureTooHighvariable.AsBool = isAboveThreshold;
}
Once applied, parts with a temperature above the configured threshold value are displayed with the temperature defect too high.
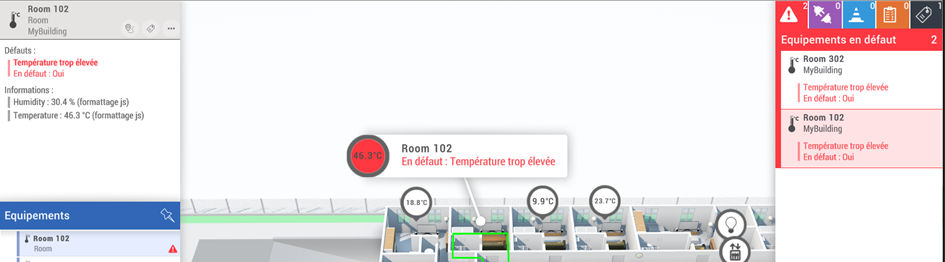
In our case, the generation of alerts is calculated by the application. However, it may be relevant to deport this calculation directly to the Connector, in particular in order to enrich the alert with temporal information or when historization needs are required.
In the latter case, when the alert is declared at the Connector level, it is then connected as a classic variable, and no longer defined via a declaration in the script.
The example of the garage door illustrates how this works.