The Recovery Console
- Tutorial
Training
The console Recovery by RestFrontage, entitled Advanced administration options, helps you diagnose access difficulty, remediate storage destinations, and regain administrator access. It is intended for administrators and those responsible for operating your Immersive installation.
At the end of this training, you will be able to open the console, choose the appropriate control, interpret its result and complete an intervention. Plan about 30 minutes of reading, then a practice on your training environment.
Screenshots show the interface with fictitious training data. Examples include machine names, base names, table names, and identifiers: always use the values that are expected for your installation.
In this article
1. Prepare your intervention
Before opening the console, make sure you have the RestFrontage server address and its recovery key, also known as Emergency key. This key is separate from your Immersive account password or Cerebrate's password. Ask the person responsible for your installation if you don't have it.
To correct a connection or storage destination, have the new settings communicated to you and plan for the restart with your operator. A destination change does not automatically move the data already in the old destination.
The MFA save, store creation, import, and reset functions have an effect on the installation. For a training exercise, use the environment designated by your instructor.
2. Open and unlock the console
- In your browser, open the RestFrontage address followed by /Setup/Tools, for example
https://votre-serveur/Setup/Tools. You can also open /Setup, then click Advanced options. - Verify that you are on the server affected by the intervention.
- Enter the emergency key in Recovery key.
- Click Unlock.
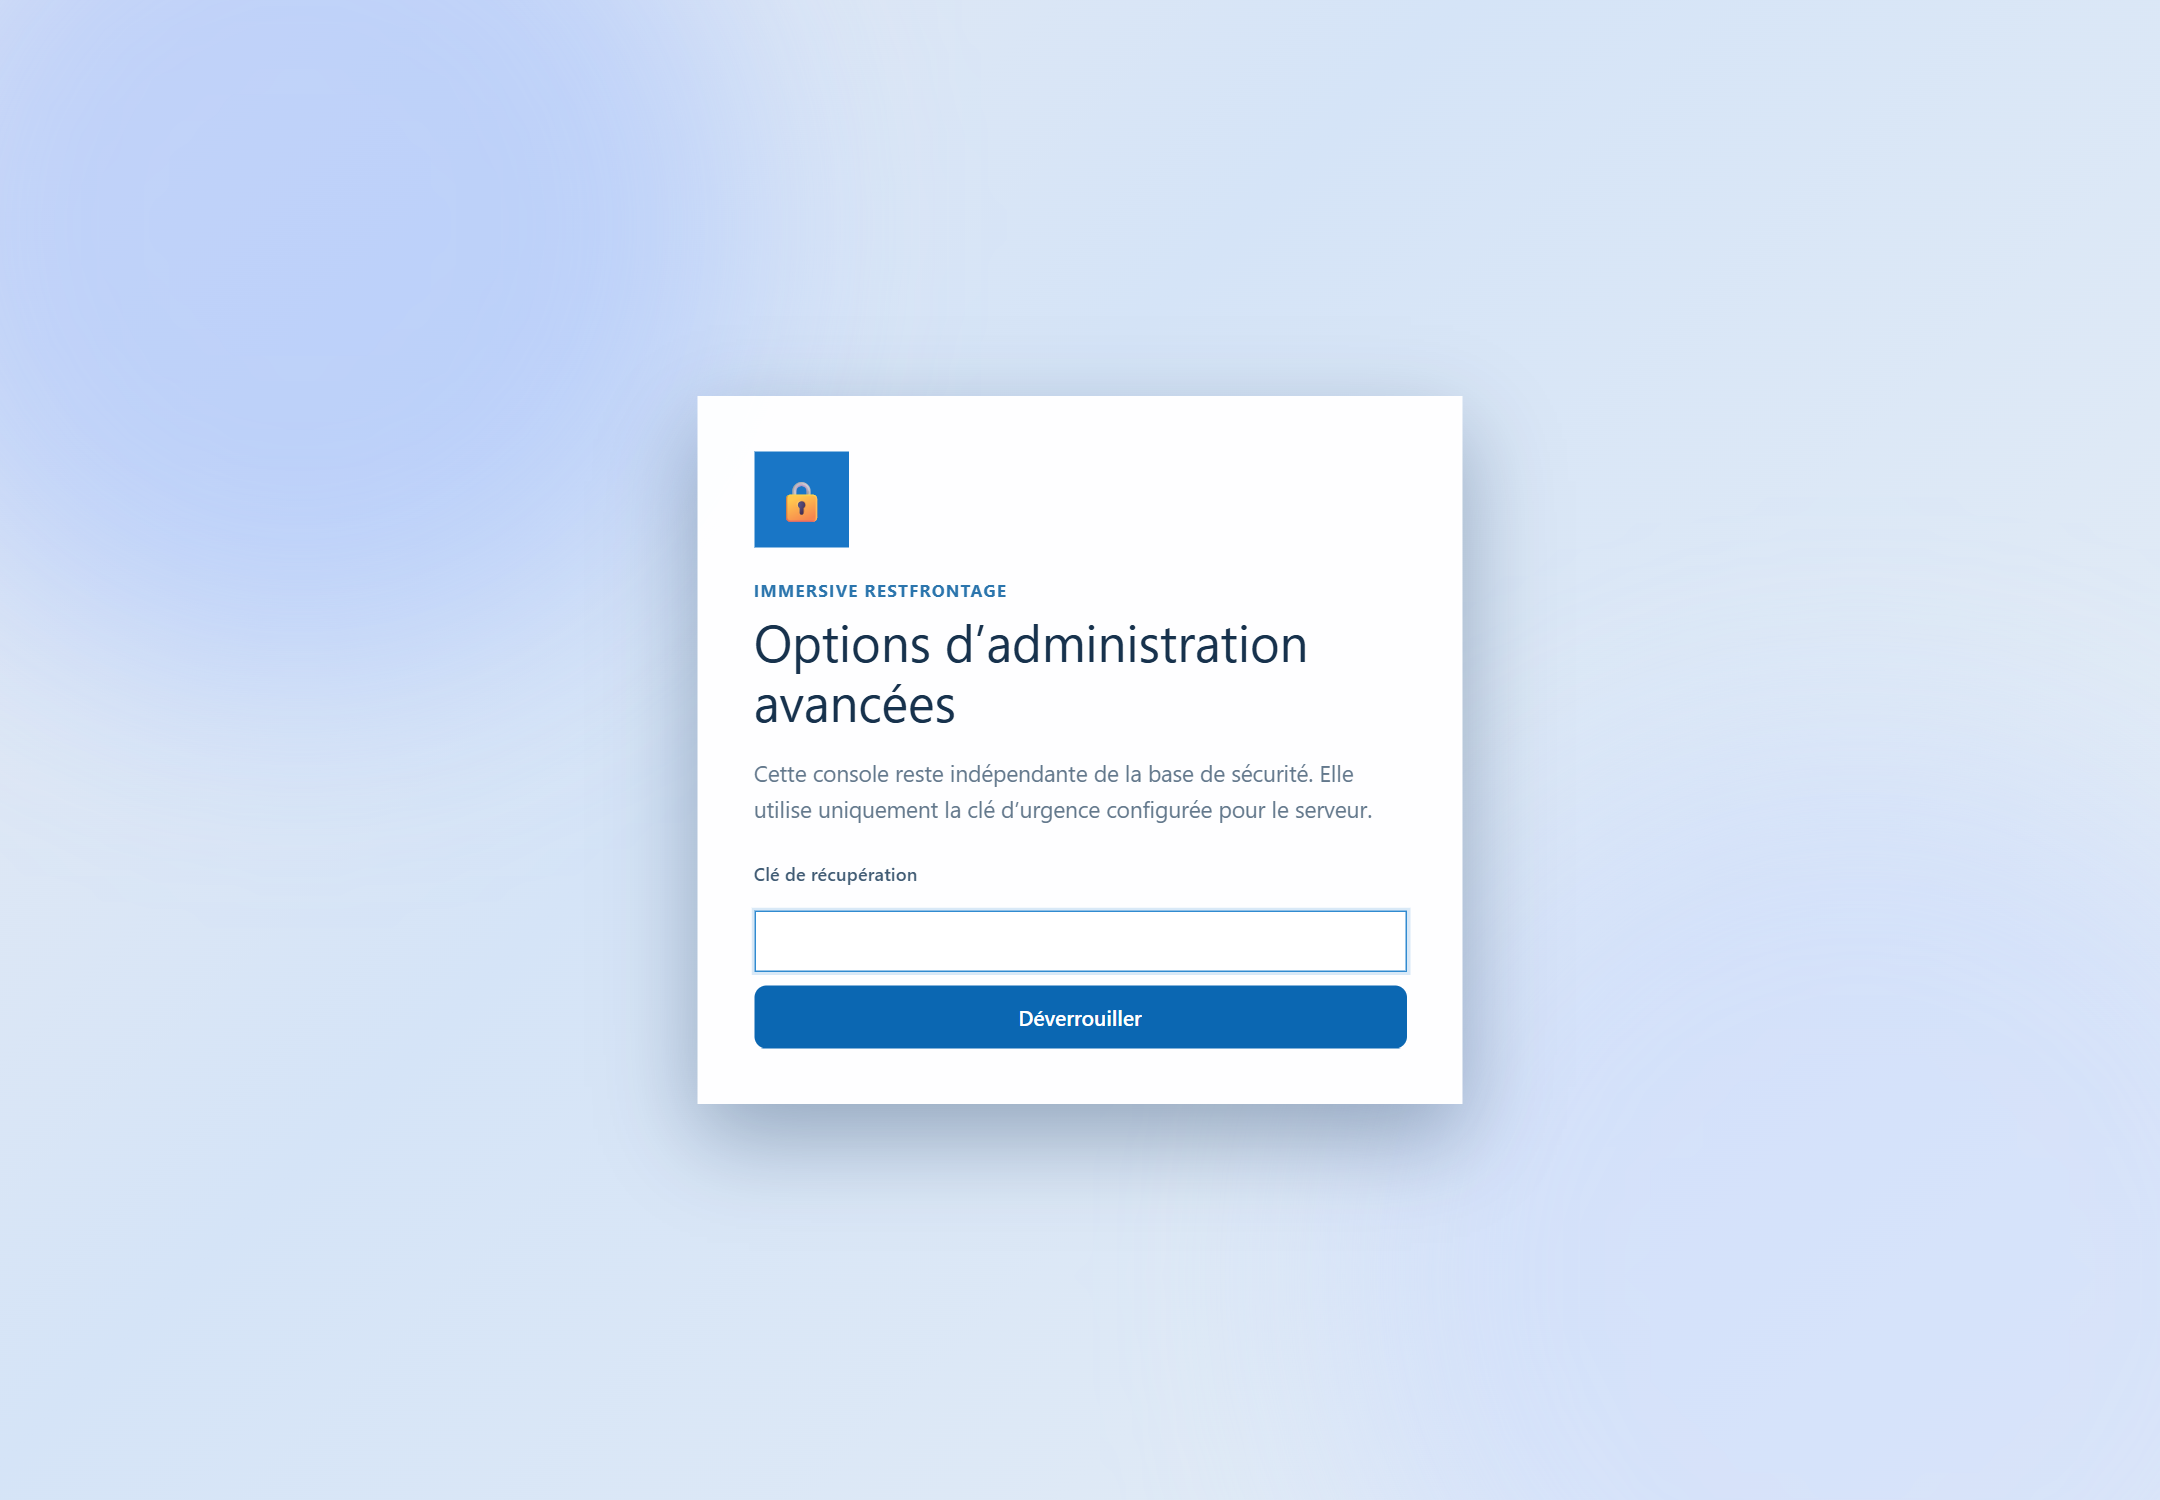
Expected result: the tool tiles appear and the Server Status appears.
Access to the console remains independent of the usual connection to Immersive. It can therefore be used when this connection is disrupted, provided that the RestFrontage server itself remains accessible. However, operations that use a database or storage require that this destination be reachable.
The access authorisation is valid 30 minutes. If the console locks or reports that access has expired, unlock it again. If you see a message that no keys are configured, ask your operator to prepare for this access.
3. Finding your way around and identifying the server
The tiles at the top of the page open the tools. The contents of the selected topic appear below it.
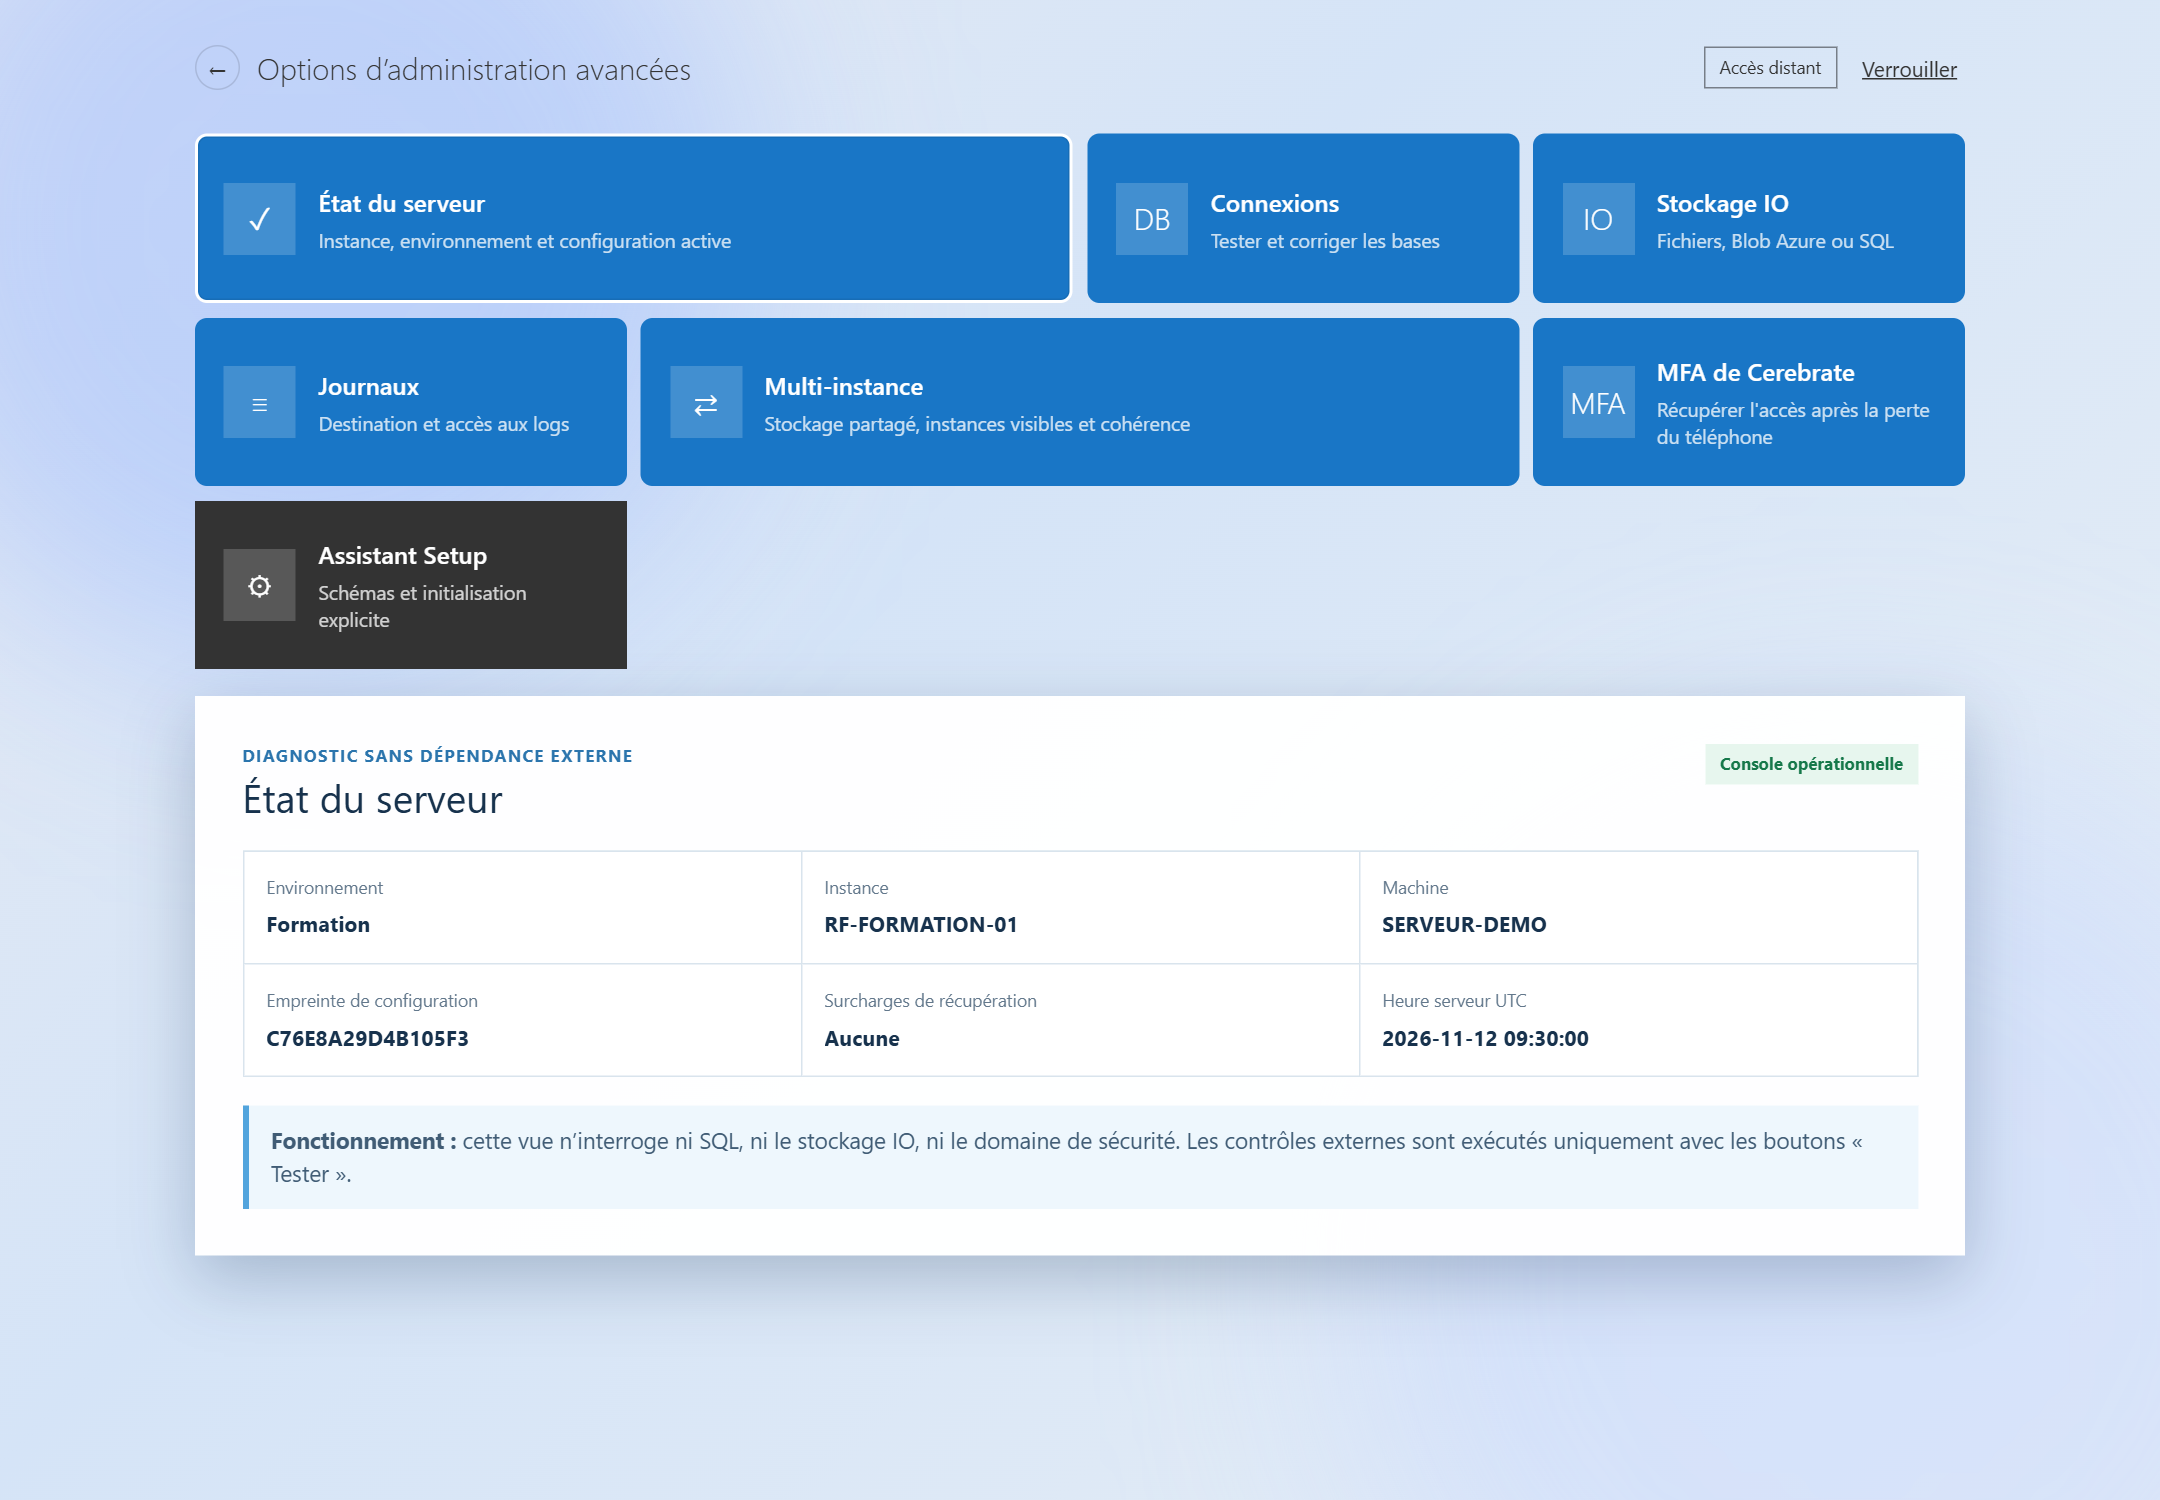
In Server Status, locate the environment, instance, and machine. This information is used to verify where you are working and to identify the server when communicating with support.
L’Configuration Footprint is used as a benchmark for comparing instances. The Recovery Overloads: Present indicates that recovery settings are being saved. This is not an error on its own. The time displayed is in UTC ; It may differ from the local time of your extension.
The seer Operational Console confirms that this view is available. It does not confirm access to databases, files, or logs. Use the controls in the topic to verify these accesses.
| Your need | Topic to open |
|---|---|
| Control access to a database | Connections |
| Check or correct file locations | IO Storage |
| Verify the destination and writing of the logs | Newspapers |
| Control multiple RestFrontage instances | Multi-Instance |
| Replacing Cerebrate's Lost MFA Medium | Cerebrate's MFA |
| Install an exported organization on an empty server | Install from an IPX, if this tile is proposed |
| Go back to the initial setup steps | Setup Wizard |
Setup Wizard opens another path. Use it when your installation requires an initialization or upgrade, according to the procedure provided by your operator.
4. Test and fix database connections
Open the tile Connections. The screen Connection Strings Shows the configured destinations and a form for each destination.
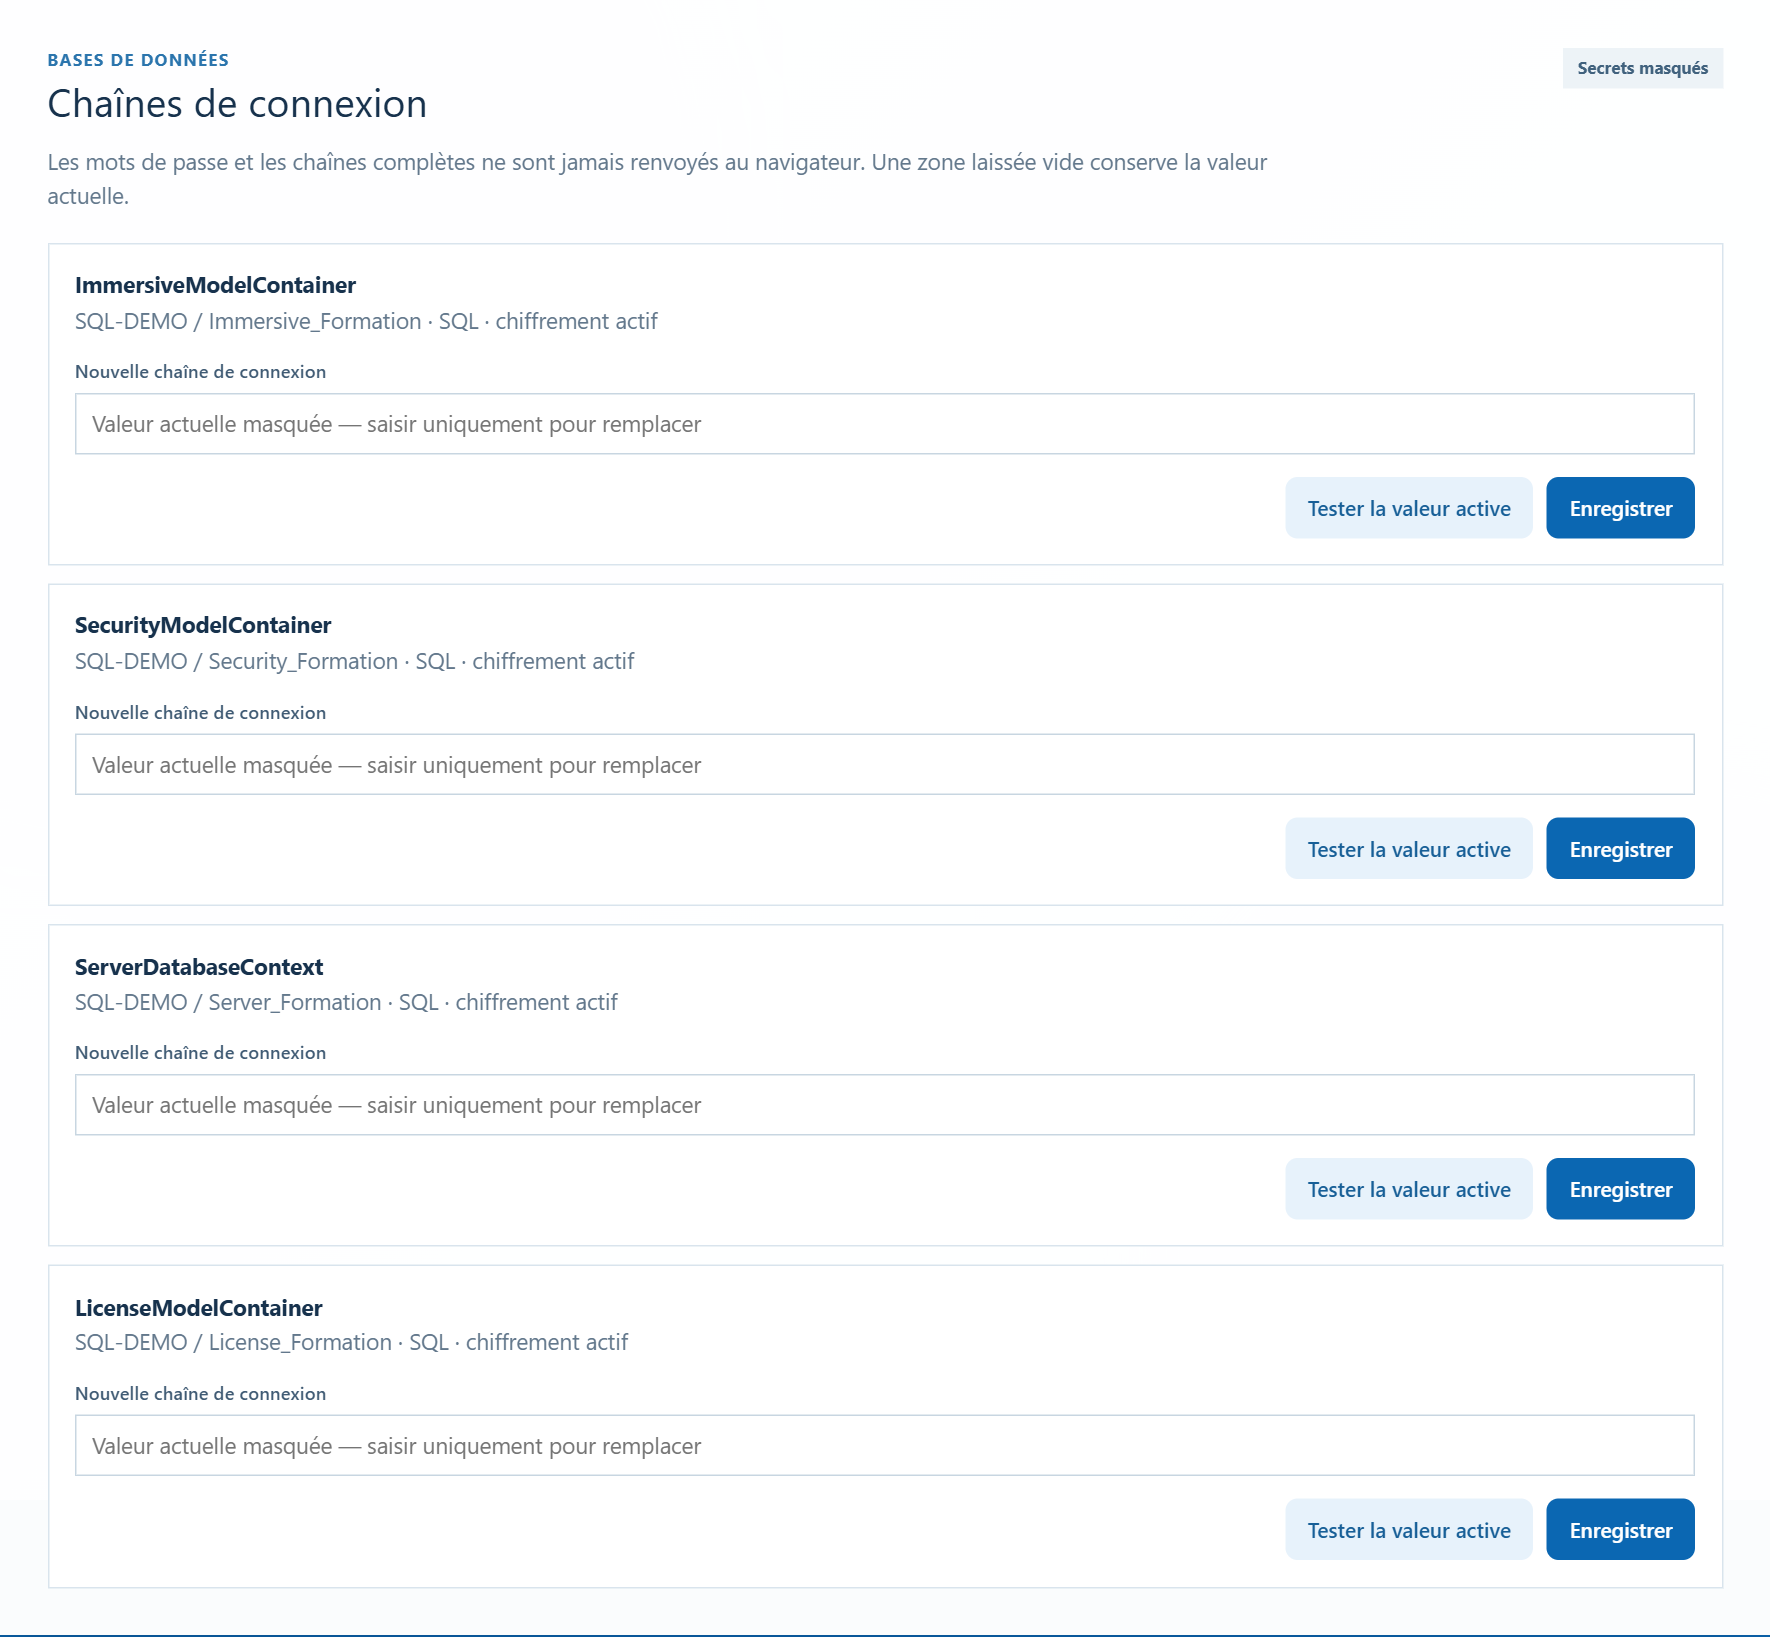
| Label displayed | Usage |
|---|---|
| ImmersiveModelContainer | Immersive Business Data |
| SecurityModelContainer | Accounts and Security |
| ServerDatabaseContext | Server operating data |
| LicenseModelContainer | Licenses |
4.1 Verify a connection
- Locate the connection you want to check.
- Click Test active value in its box.
- Wait for the result displayed under the buttons.
- If it fails, note the connection label and the full message for your operator or support.
Expected result: The test confirms that the destination is reachable. This connection control alone does not validate all of the application's functions.
4.2 Replace a connection
- In the relevant box, fill in New connection string with the value provided for your installation.
- Click Save.
- Check the confirmation message.
- Restart the server as prompted by the message.
- Return to the console, run the test again, and check the expected operation in Immersive.
Test active value does not test the text you just typed until it has been saved. A successful recording does not replace the restart or final check.
Full strings and current passwords remain hidden. An empty field retains the existing value; it does not erase it. In this topic, click Save No new value displays that no changes have been made.
5. Check and configure file storage
Open IO Storage. The sign bears the title IOSettings and allows you to define the location of the files used by Immersive.
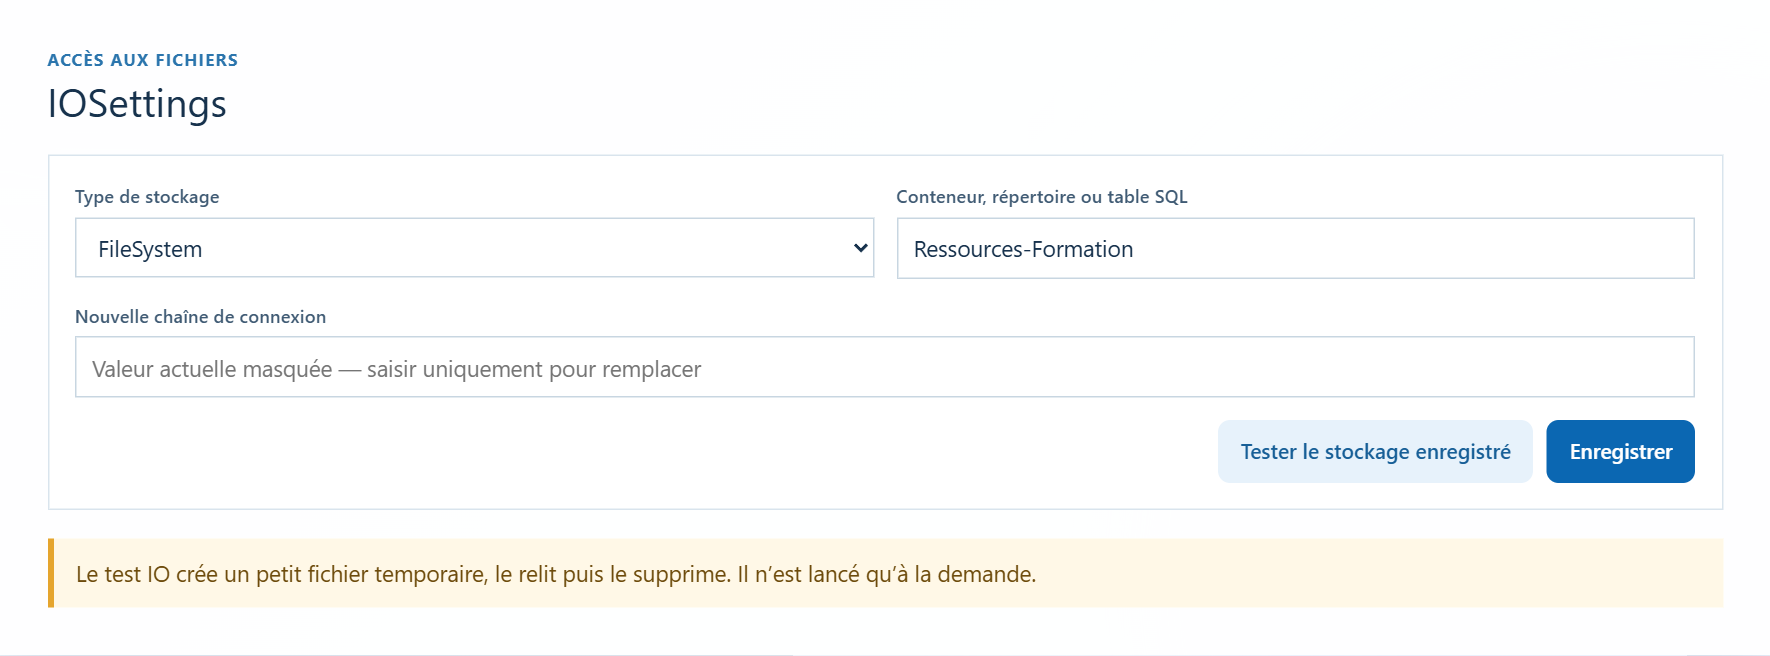
| Storage Type | Location Used |
|---|---|
| FileSystem | A file directory accessible by the server |
| AzureBlob | An Azure Blob Storage container |
| HostEnvironment | A directory attached to the application's location on the server |
| SQL | A table in an existing SQL Server database |
5.1 Control Saved Storage
- Click Test Registered Storage.
- Wait for the result.
- Verify that the test confirms that its temporary file has been created, read, and deleted.
This test uses the saved parameters. It performs a temporary write to the destination; it does more than just check for its existence.
5.2 Change settings
- Select the Storage Type designed for your installation.
- Inquire SQL container, directory, or table.
- If necessary, enter the New connection string. Leave this field blank to keep the current value. Pros HostEnvironment, this field is not offered.
- Click Save and check the confirmation.
- Restart the server to apply the new destination to the file service.
- Rerun the control and verify access to an expected resource in Immersive.
Changing the destination does not transfer your files. Prepare for availability in the new location before switching the installation.
5.3 Prepare SQL Storage
The choice SQL Displays additional commands. Use an existing base and the table name for your installation. dbo. ImmersiveFiles is an example.
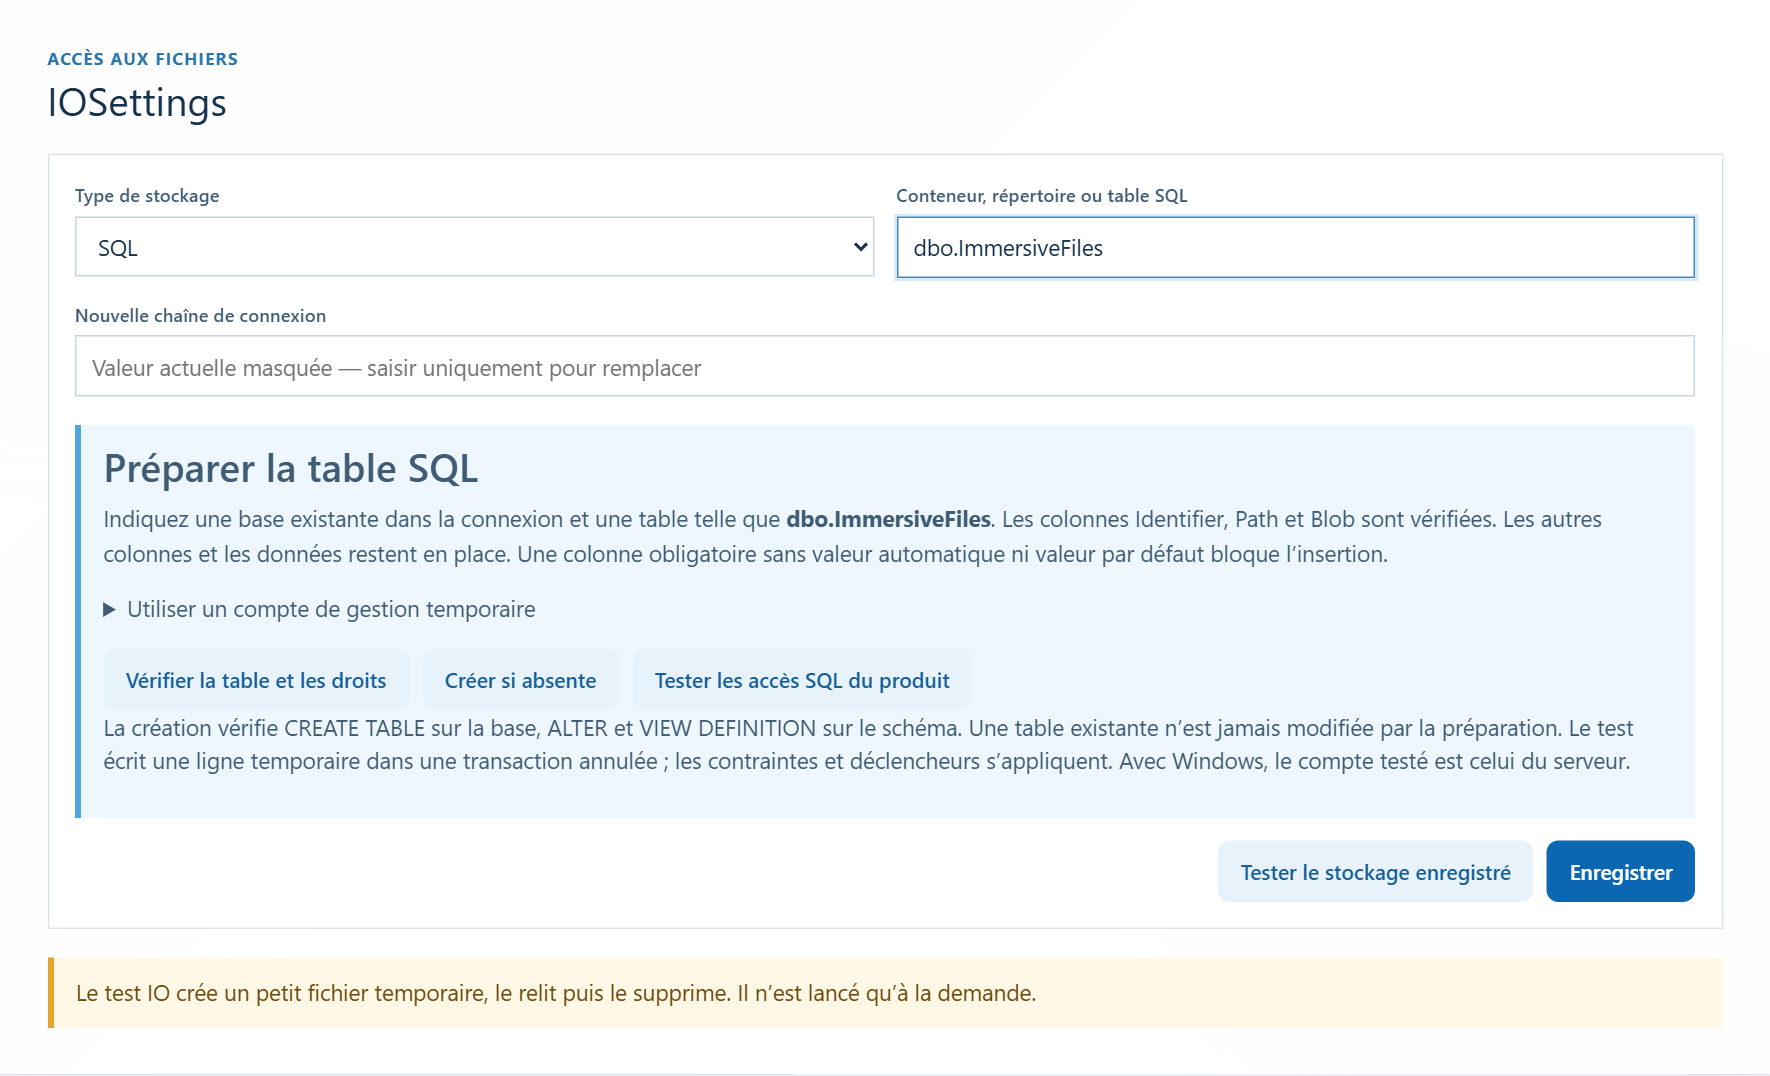
- Fill in the SQL destination and table.
- Click Check the table and entitlements and read the result.
- If the table is missing and needs to be created, click Create if absent. An existing table is preserved; this command does not correct it if it is incompatible.
- Click Test the product's SQL accesses to control the necessary access. Writes to this test are canceled when the check is complete.
- Click Save, and then restart the server.
- Check saved storage and file access from Immersive.
If your operator provides you with a separate account to prepare the table, open Use a temporary management account. This connection must be to the same server and the same database. It is not registered. With Windows authentication, access is verified with the account used by the server, not with your browser's account.
To remember: SQL preparation commands use the parameters populated in the form, but do not save them. End with Save to keep your choice.
6. Check the log destination
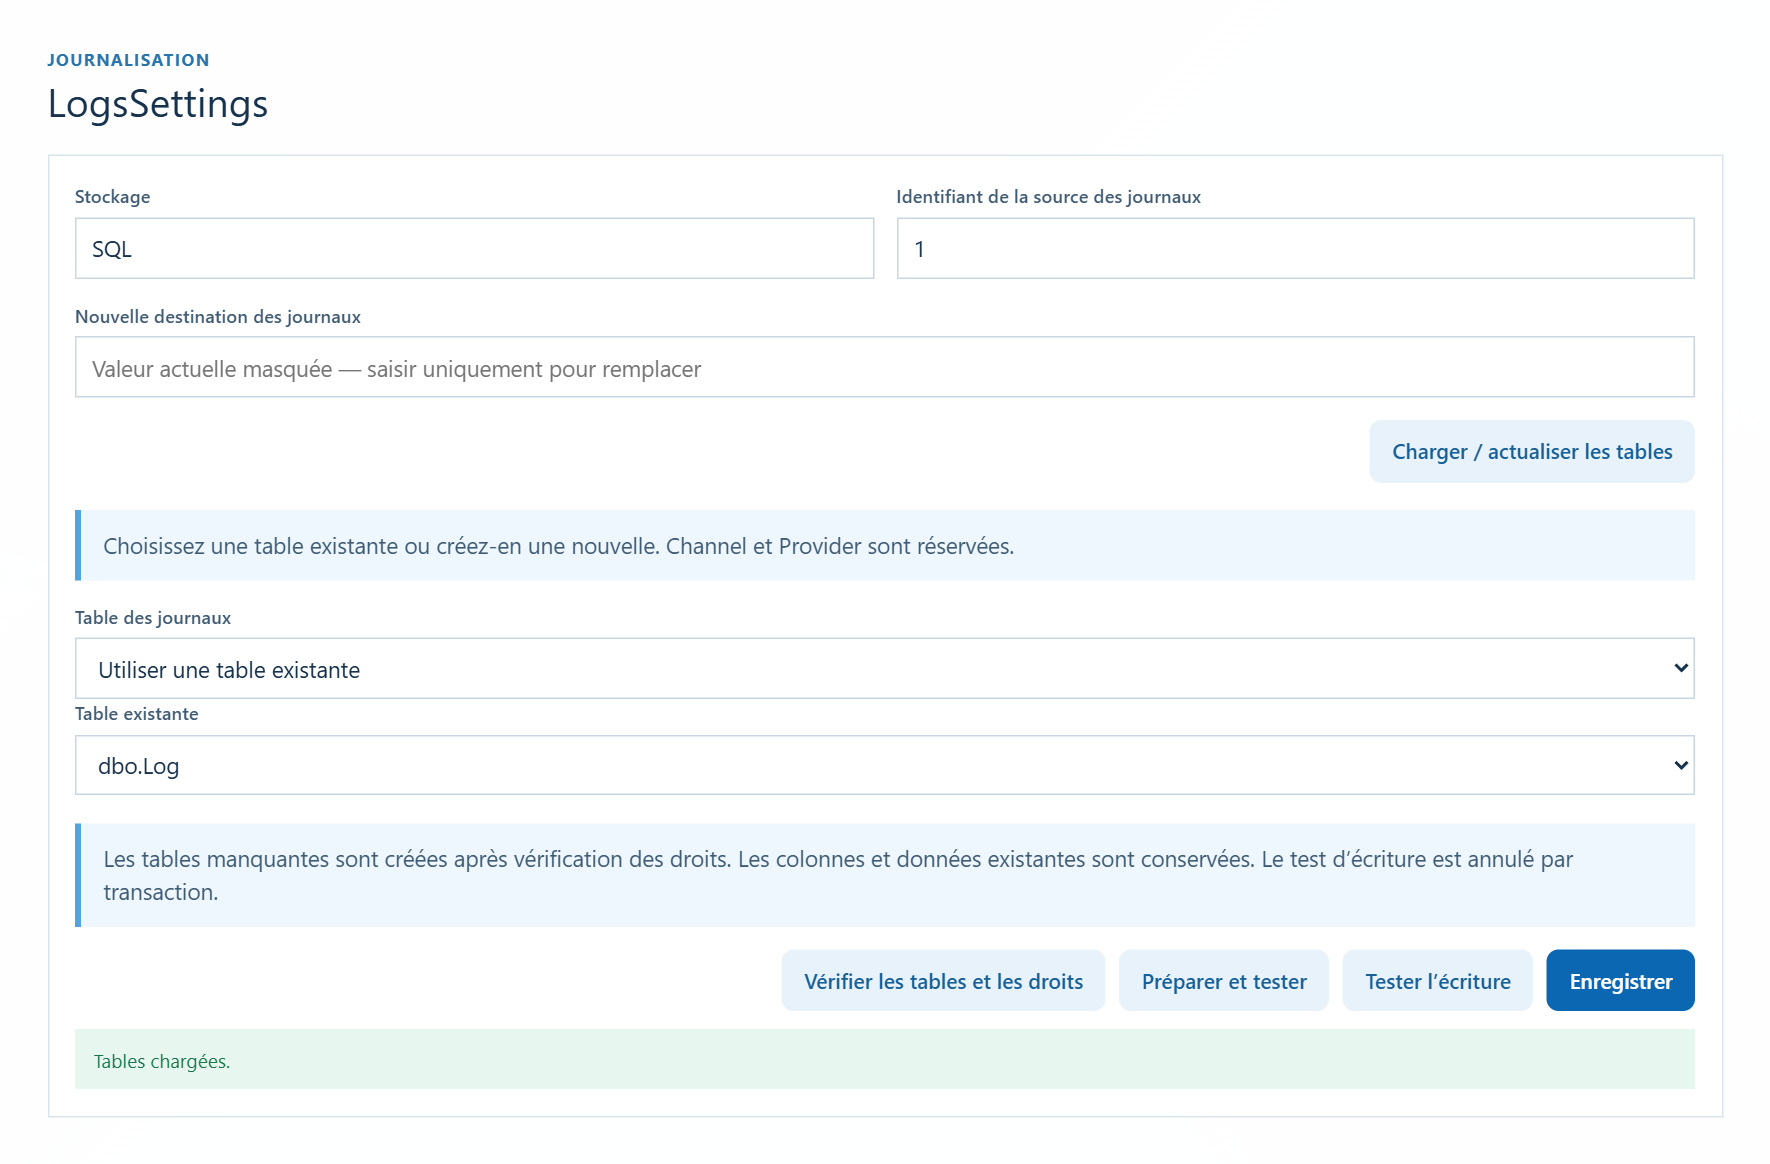
Open Newspapers. The panel LogsSettings Adjusts the destination of the logs and allows you to check the necessary access. It does not present the list of log events.
The field Storage displays the mode used and is not editable in this screen. Keep theLog Source Identifier for your installation, unless instructed by your operator.
6.1 Use an existing table
For storage SQL, SQLite and LocalDB, the console provides tools for selecting and preparing tables.
- Inquire New Log Destination if it needs to change. Leave the field blank to keep the current destination.
- Click Load/refresh tables. This list is also loaded when the panel is opened.
- In Table of Logs, choose Use an existing table, and then select the expected table.
- Click Check tables and entitlements.
- If the result indicates items to prepare, use Prepare and test, according to the settings for your installation.
- Use Test the writing to verify write capacity. Control writes are canceled at the end of the test.
- Click Save, and then restart the server to apply the new settings to the logs.
Expected result: The checks pass, and then the console confirms the recording. After restarting, check with your operator to make sure that the new events arrive at the intended destination.
6.2 Create a new table
- Load the tables for the destination.
- Choose Create a new table.
- Enter the Name of the new table designed for your installation.
- Click Check tables and entitlements, then click Prepare and test if the creation is allowed.
- Check the result, click Save, and then restart the server.
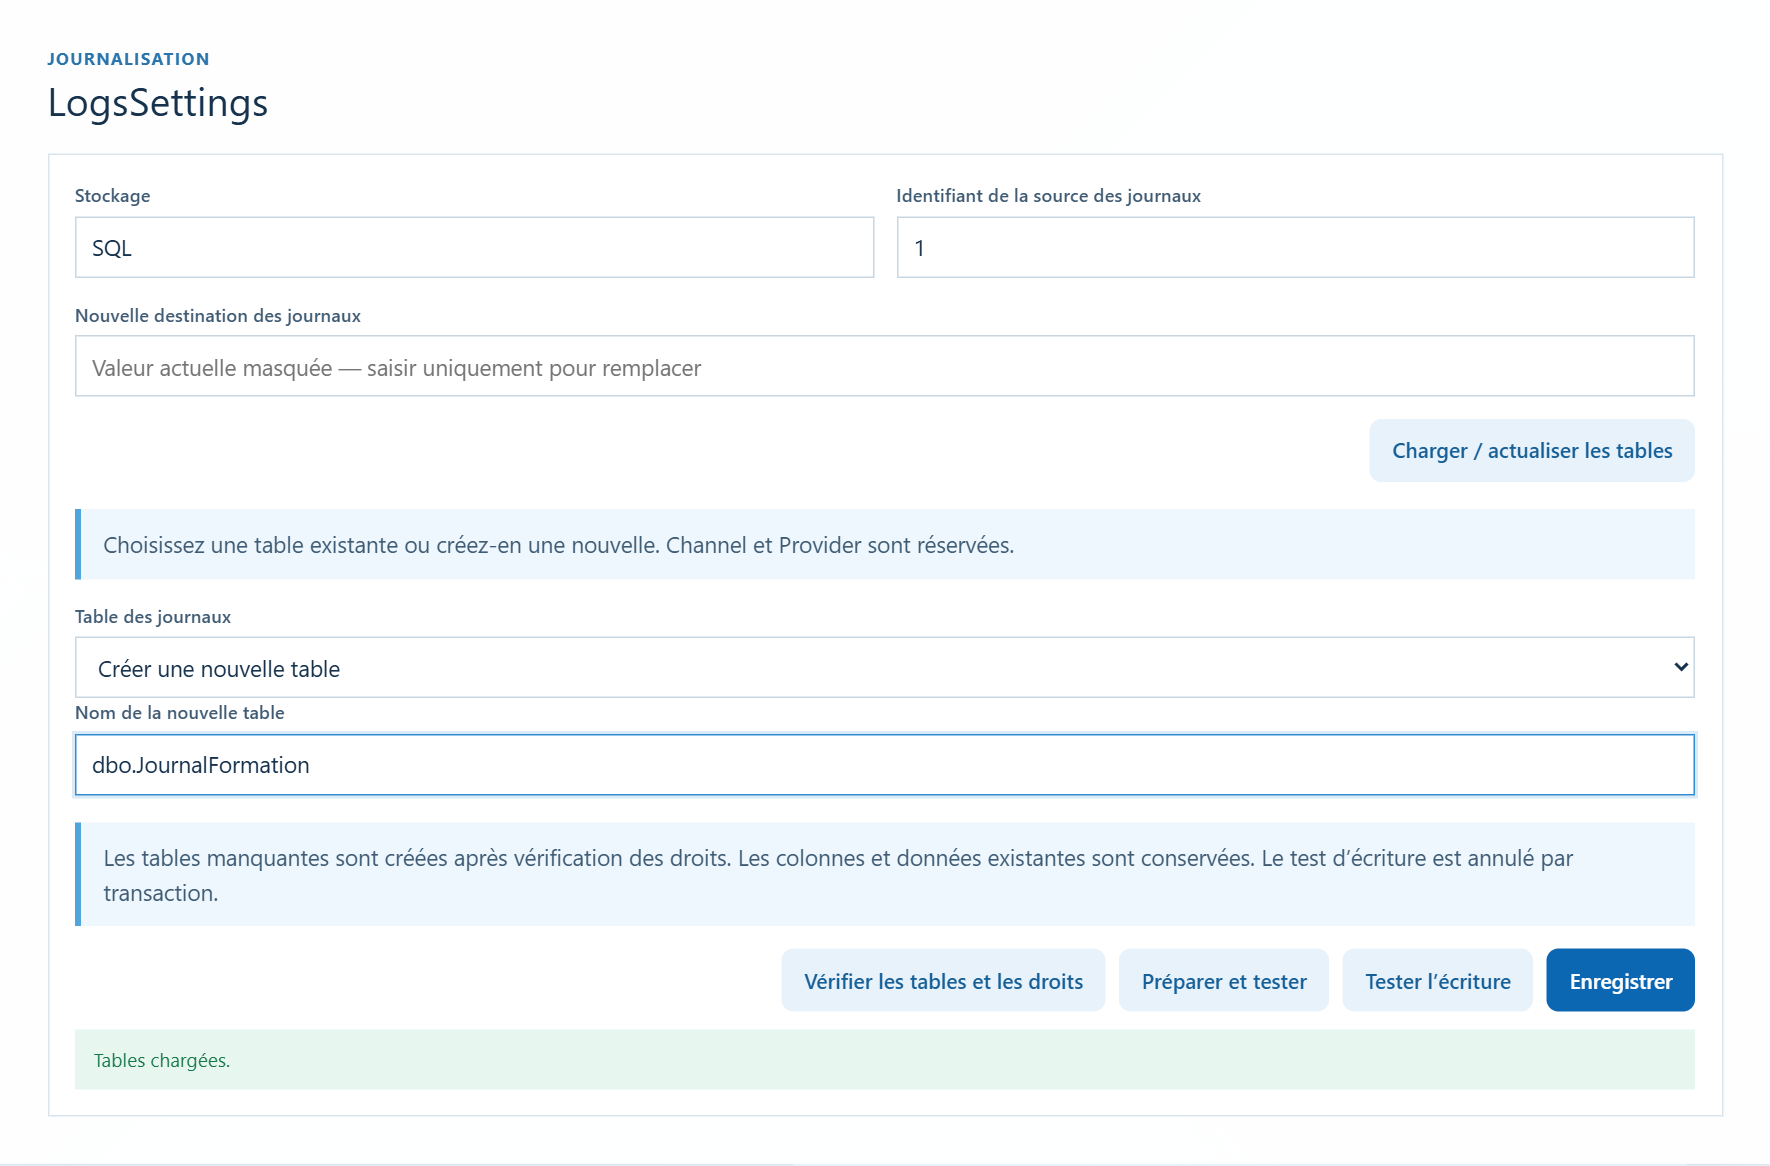
If the console detects a new database, it offers automatic preparation and sets the name of the log table to Log. Then follow the instructions displayed. For LocalDB, the preparation is done under the server's Windows account.
After each destination change, reload the tables. Until they load successfully, some commands remain disabled. Prepare and test can create the missing items, but doesn't save the destination choice: Save remains necessary.
For other modes, the screen can offer Test access. Read the scope of the finding: A readable folder does not guarantee that the server can write logs to it.
7. Controlling a multi-instance installation
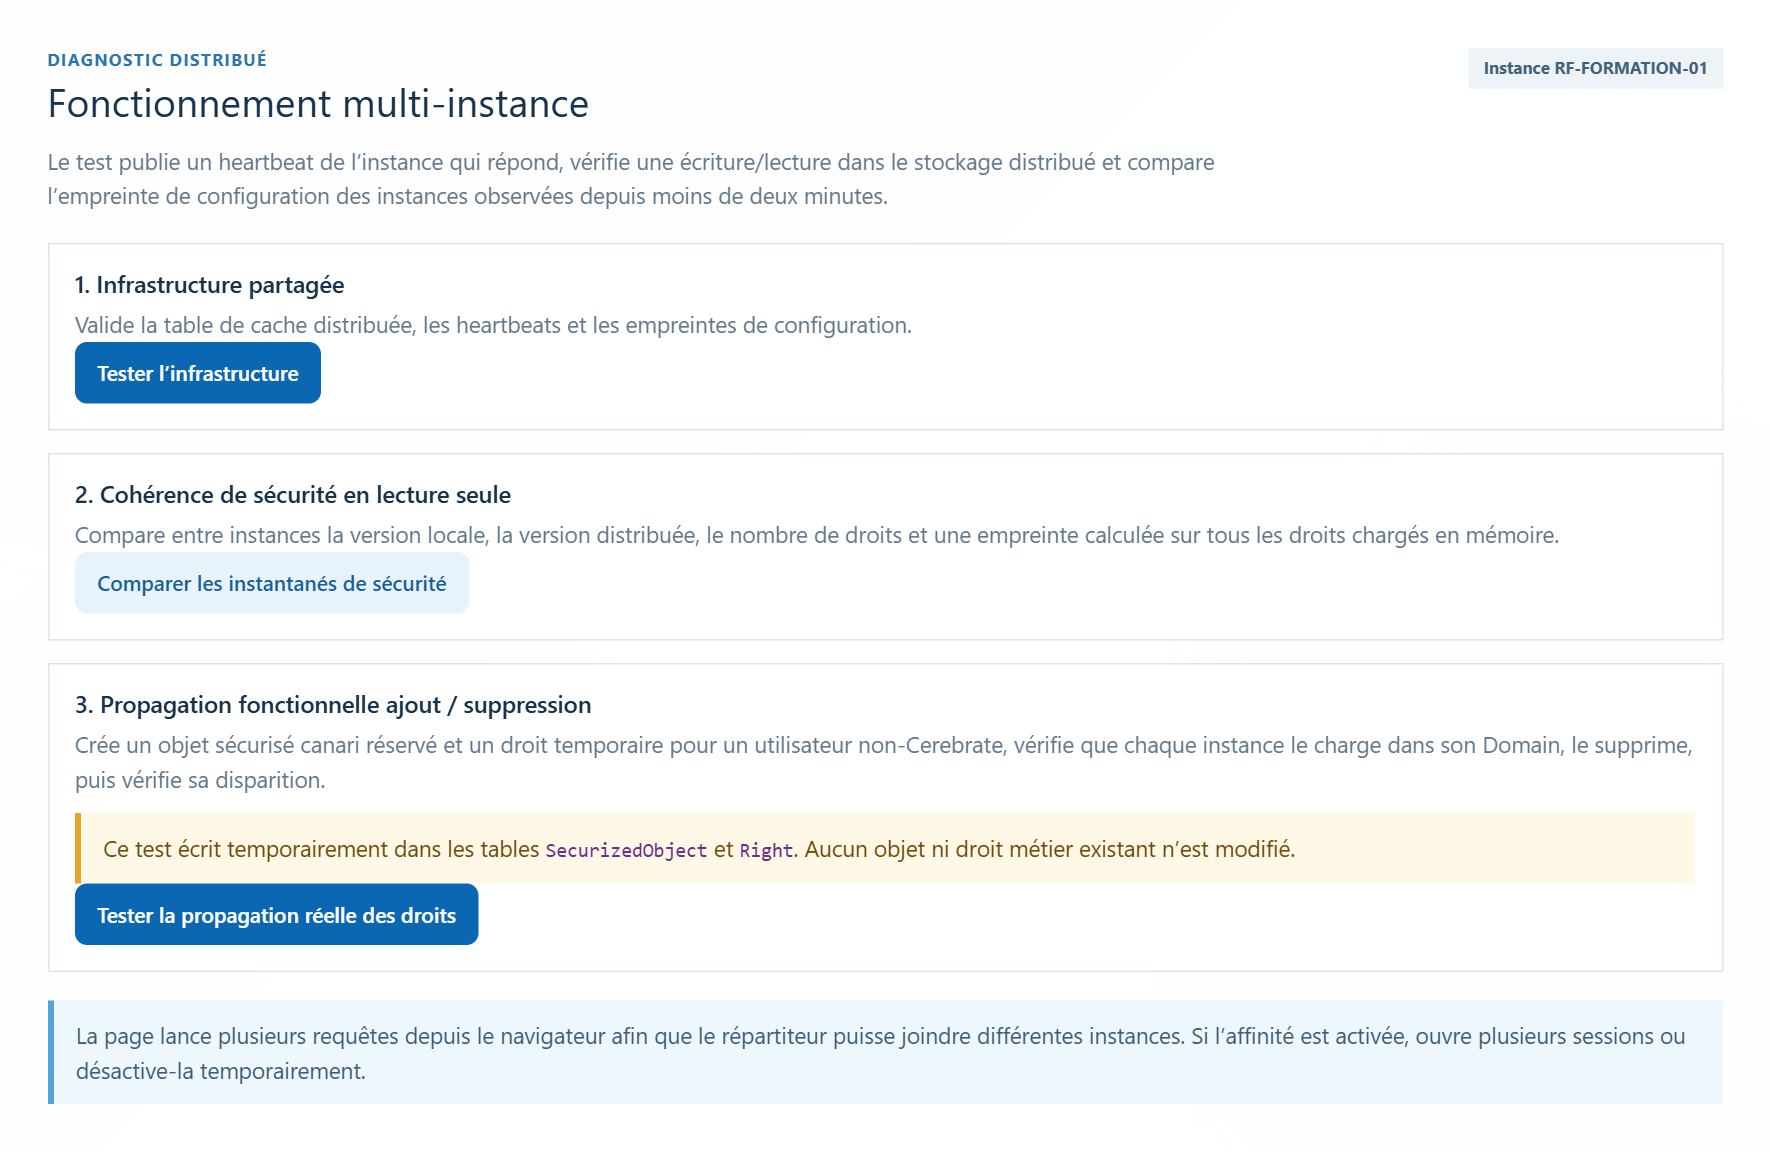
This topic applies to installations where multiple RestFrontage instances participate in the same service. Open Multi-Instance and perform the checks in the order provided.
7.1 Test the infrastructure
- Click Test the infrastructure.
- Wait for the survey to complete.
- Identify the instances displayed and any configuration deviations.
The control checks how shared storage is working and shows recently observed instances. It distinguishes between instances that are reported as active and those that have responded directly to your browser's survey.
7.2 Compare security states
- Click Compare Security Snapshots.
- Wait for the answers.
- Verify that the responding instances have a consistent security state.
This control is read-only. A result indicating thatOnly one instance responded does not allow us to conclude that all the proceedings are consistent.
7.3 Verify the actual propagation of rights
- Arrange the test with your operator.
- Click Test the actual propagation of rights.
- Read and accept the confirmation request.
- Allow the test to complete and check the result of the addition and then removal.
This control creates a temporary right reserved for the test, verifies that it is taken into account by the instances, and then removes it and controls its disappearance. Existing business rights are not changed. The whole thing can take several minutes.
This third check makes temporary writes. Wait for its final report. If it is interrupted or reports a failure, keep the message and ask the operator to check the end of the test before restarting it.
If some expected instances do not respond, the load balancer can keep your browser on the same instance. Ask the operator to check the routing; a successful result covers only the instances that are actually observed.
8. Retrieve Cerebrate's MFA
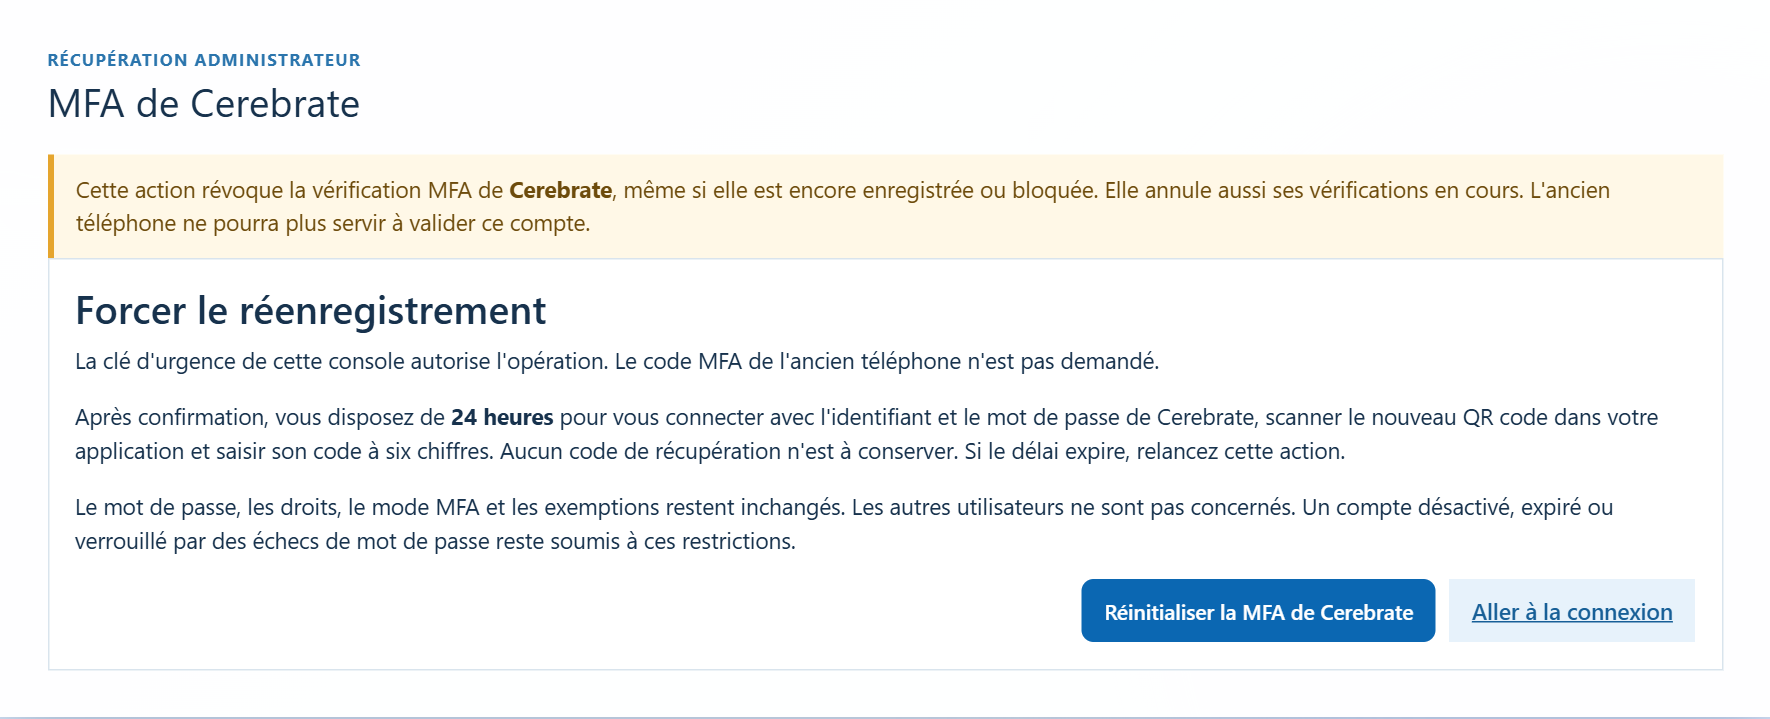
Use this procedure when the phone or the Cerebrate is lost, replaced, or inaccessible. You must have the server emergency key and Cerebrate ID and password to complete the recovery.
8.1 Authorize a new verification method
- Open Cerebrate's MFA.
- Click Reset Cerebrate MFA.
- Read the confirmation and confirm the transaction.
- Wait for the success message.
The reset immediately revokes Cerebrate's old MFA method and cancels its ongoing verifications. The old phone will no longer be able to validate this account. You have 24 hours to save the new way.
8.2 Register the new app
- Click Go to login.
- Log in with the usual Cerebrate ID and password.
- Follow the re-registration screen: scan the new QR code in your TOTP-enabled authenticator app.
- Enter the six-digit code from the app and validate with Check.
- Verify that you can access your account with the new verification method.
The old MFA code is not requested and no additional recovery codes are to be kept. If the 24-hour period expires before the process is complete, restart the reset from the console.
Password, rights, and other users are not changed. This action does not reactivate a disabled or expired account or lift a lockout related to password failures. If sign-in is still unable for any of these reasons, have this issue addressed separately.
9. Install an organization from an IPX
The tile Install from an IPX is offered only when the server can verify that no organization exists in the destination. It is used to install an exported organization on an empty server. It does not replace an organization that is already present.
Before you begin, check with your operator that the business and security basics are configured in SQL Server, that the resource storage is ready, and that the .ipx was produced by the same version of Immersive.
For this import, the supported file stores are FileSystem, HostEnvironment and AzureBlob. IO storage SQL is not supported by this import function.
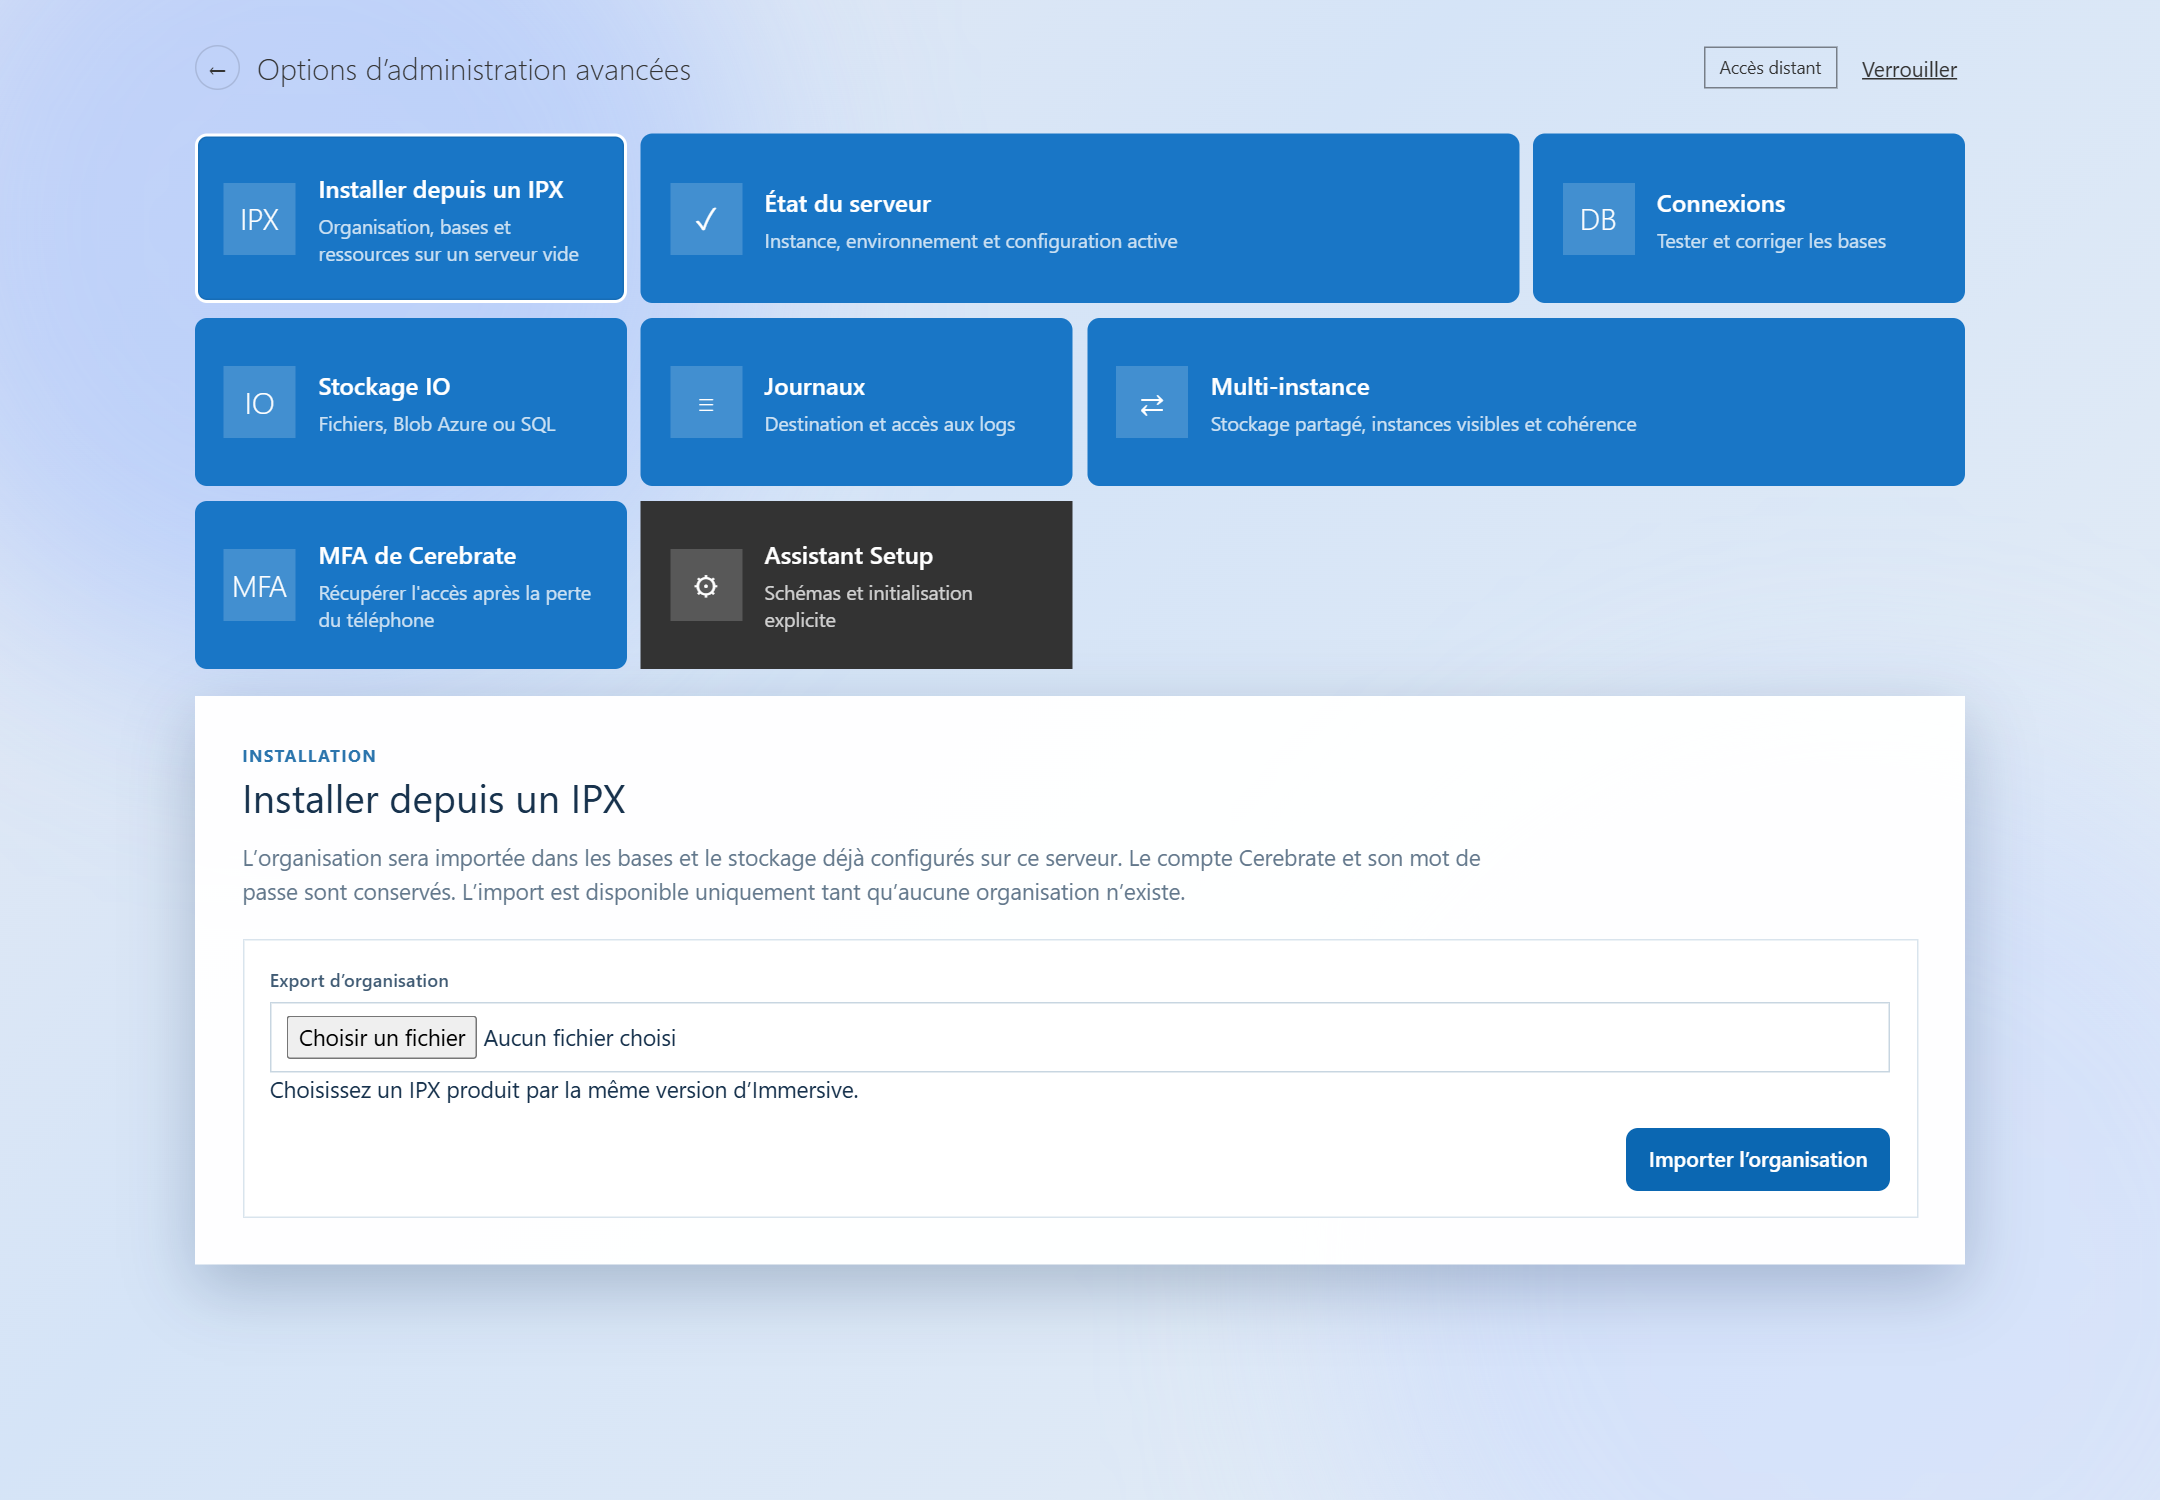
- Check the connections and destination storage. If you just changed them, perform the requested restart before importing.
- Open Install from an IPX.
- In Organization Export, select the .ipx provided for this installation.
- Click Import Organization.
- Leave the page open until the report is taken and, if applicable, until the server is back up and running.
- If a restart is requested, have it performed. If the Setup wizard opens, complete the necessary steps; if the login page opens, log in.
- Check the organization's presence and access to its resources.
Expected result: The console confirms the import. The destination already configured on the server is used; the Cerebrate account and its password are preserved.
If the tile is missing, an organization may already exist, or the destination may not be verifiable. Start by checking the connections. An inaccessible database should not be considered an empty server.
If it fails, keep the displayed message and have the destination checked before retrying.
10. Complete the intervention and resolve common difficulties
- Check the result of the last check.
- Perform the requested reboots after a configuration change.
- Validate the expected operation from Immersive: connection, access to a resource or other function concerned.
- Click Lock in the upper-right corner of the console when you're done.
| Location | Recommended action |
|---|---|
| Incorrect recovery key | Make sure you're using the correct server key, not an account password. |
| Expired console access | Unlock it again with the recovery key. |
| Operational Console, but one feature remains unavailable | Start monitoring the affected database or storage. |
| A connection is Not configured or Invalid format | Have the settings confirmed, and then use the appropriate override form. |
| A change is saved but the behavior remains unchanged | Verify the restart and the affected instance with your operator. |
| Log controls remain disabled | Click Load/refresh tables and process the upload message. |
| Only one instance responds | Have the routing checked before concluding that the entire installation is working properly. |
| Cerebrate still can't connect after MFA reset | Check the 24-hour time frame, password, and account status. |
| IPX installation tile does not appear | Verify that the destination is reachable and does not contain any organizations. |
To facilitate a support request, communicate the time of the problem, the instance listed in Server Status, the topic used, the action taken, and the exact message. Attach a useful screenshot by hiding confidential information. Do not pass the emergency key or passwords in your report.
11. Putting it into practice
On the training environment indicated by your trainer, complete this short course.
- Unlock the console.
- Identify the environment and instance.
- Open Connections and test the instructor-designated connection.
- Open IO Storage and identify the type of storage, without changing the fields.
- Find the topic to use if Cerebrate loses his phone.
- Lock the console.
11.1 Check your knowledge
| Question | Expected response |
|---|---|
| Is the recovery key Cerebrate's password? | No, it's a separate, server-specific key. |
| The seer Operational Console Does it validate all the basics? | No, each access must be checked in the appropriate section. |
| Test active value Is it checking a string that has been entered but not saved? | No. |
| After a connection, IO storage, or log change, what step is still needed? | The requested restart, then a check of operation. |
| Does preparing a table save the destination? | No, you also have to click on Save. |
| How long does Cerebrate have to re-record his MFA? | 24 hours after reset. |
| Can I import an IPX to overwrite an existing organization from this console? | No, this feature requires a server without organization. |