Forge: First map.
- Getting started
Training
Creating a map in Forge is the First step in the modeling process. It is at this point that the foundations of the future representation are laid: name of the project, visual style, geolocation, and structure of the floors. Forge offers a Guided authoring tool, designed to be fast, intuitive, and accurate at the same time.
This chapter explains how to:
- Define the Card Name and associate with it a Graphic style.
- Geolocation the map from an address or by manual adjustment.
- Create and organize Floors that will make up the vertical structure of the building or site.
This creation phase conditions the smooth running of the following stages (modelling, editing, exploitation) and ensures a smooth Overall coherence of the project from the start.
Prerequisites
- Have Forge installed
- Have launched Forge connected to the target organization where the card will be stored.
- Have knowledge of the Forge interface and the role of its different parts.
The creation of a new map is done via a simplified tool accessible from the main menu.

This map creation process is divided into three successive screens:
Screen 1: Defining the name and choosing the style
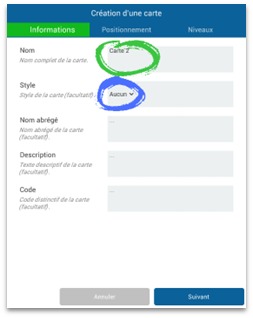
- Enter the name of the desired card. This name will be used and displayed in other applications.
- Choose the style to associate with the map. If the style does not yet exist, leave it to "None".
Screen 2: Geolocation
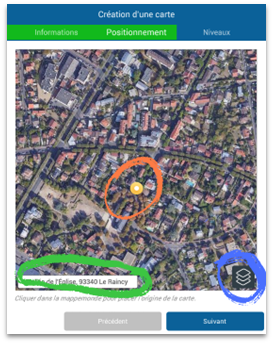
This icon allows you to change the source of the basemap used in this window.
- Enter the address of the place to be mapped and press the enter key on the keyboard. Once the address has been validated, the chosen location will be displayed.
- It is possible to refine the geolocation by left-clicking the mouse on the desired location. The location of the yellow circle defines the center of the map created.
Screen 3: Managing floors
This screen allows you to define and name the different floors that will make up the map. The order displayed, which can be modified by the associated arrows, will be the one used later in the listing of the floors.
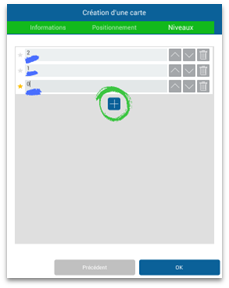
- Add a corresponding number of floors as needed using the + button.
- Fill in the floor names.
- Select the preferred floor by clicking on the star at the beginning of the line. This floor will be displayed by default when the map is opened.
Then validate the creation of the map by pressing "OK".
With the map now created, it's time to save, by pressing the Commit button in the top right.